Tuesday, February 24, 2015

BFTPqal pages 19, 20, & 66

Sorry we're a day late today -- we had a leetle mixup in our schedule, but here we are!  Our next round of blocks were made by Terry Griffin, who has the CUTEST pattern shop {HERE}. Please take a minute and go there -- you won't be sorry! She had some of the cutest quilts and table runners -- I just want to make them all! I have a goal to make a table runner for every season and holiday, and these are a great way to do just that. I got to go with Terry to Quilt Market last May, and it was so, so much fun!  I'd go with her again in a heartbeat. :)  Terry uses a couple of techniques that are different from what I usually do, so I'll have to try those and see what I like best.

Here's Terry's post:


I got to do the "Grandmother's Choice, Anvil and Friendship Basket" blocks from the "Blocks From The Past".

Actually, going "modern" is really out of my comfort zone......but, I have really enjoyed using solids...although I still couldn't do the white background!! I remember too many days of scrubbing stains from and ironing white table clothes, pillow cases and sheets, at my Grandma's!

I was at Quiltique in Henderson, NV, (what a shop-loved it) and found the latest collection of Kona Solids and decided I could work with them. Since the blocks were from the "past" I decided to do the piecing by hand, using my grandmother's technique; a small running stitch with a backstitch every three or four stitches to lock the seam. This worked great since (as most of you know) I have a son who requires 24/7 care and when I sit with him in the evenings, turning the TV channels, getting Trail Mix, answering the phone for him, etc. etc.. If I don't have something to keep my hands busy I go crazy!!


I first marked 1/4" seams, with a pencil, on all sides of the lightest solids.

Then I matched corresponding pieces and pinned the intersecting points.

Using a Size 11 milliners/straw needle, I stitched the seams with a small running stitch. I also used Jill Finley's Polk-A-Dot sticky thimbles. They are great! As I pieced, I pressed the seams to the dark side.

Oh, what fun!!!

"Grandmother's Choice"

More Fun!

"Anvil"


"Friendship Baskets"

The "Friendship Baskets" block was considered an applique block since the handles were appliqued to the background fabric. Because these were straight lines, I followed the pattern and pressed the 3/4" strip into thirds. When I do curved applique, I like to use Kim Diehl's method of applique using freezer paper.

I really enjoyed this project....I think I will finish the whole book of blocks!!!
Marion and Natalie thanks for letting me participate.

Monday, February 23, 2015

Technical Difficulties & Urban Churn Dash charity quilts

I'm sorry to say, we're experiencing some technical difficulties today. I'll post this weeks' blocks just as soon as we've resolved them

In the meantime, here's a fun project I've been working on with my little neighborhood quilting bee: Urban Churn Dash blocks. Here are my completed blocks:


And all the blocks I've received so far:

Haha, can you tell I got a couple that are still in pieces(only one is shown)? I just love these blocks! They were super quick to put together, and have such a fun impact. We are doing these for our charity block, so all the blocks have been donated - and I think we'll end up with enough for a twin-sized quilt!  We upsized the blocks to 18" finished, so it will only take 12 with sashing for a pretty good-sized quilt.  Or, I was thinking we might just do baby-sized quilts -- that way, we need multiples of four, but only four little blocks makes a whole quilt! If you know of a charity in Utah County, Utah, please comment and we'll see what

Thursday, February 19, 2015

Well, that was silly

Silly me -- last week I finished my block on Saturday, with plenty of time to publish my post before bedtime, and then I promptly forgot about it!  In my defense, I think I might have had a migraine -- is that what happens when you have a monster raging headache for three days?  It was super weird, but I think it was caused by an adverse medical reaction.  Suffice it to say, I don't think I'll be taking THAT allergy medication again.

But... I've been back to normal for a few days, phew! And here's the block I made for this week:

I really like this one! I was super careful to center my template on one of  the natural circles -- that makes me feel so tricky and clever! Funny enough, it's the only one that April didn't make -- she has her blocks blogged {HERE}.

I hope you like it too!

Thursday, February 12, 2015

Pillas

My first job ever (besides babysitting) was at a cute little consignment shop called The Quilted Quacker. It had booths in the front, that people around town would rent out to sell their crafts, and the back third was a Christian bookstore. The owner, Regina, was from Katy, Texas and had the strongest accent! She was a real sweetheart with a heart of gold, and I just loved working for her. She always made the shop super cute, and always had some potpourri scattered throughout the store.

Regina had a friend who was also from Katy, and she just loooved "pillas". My sister and I thought she said it so cute, that we started saying it that way too! The ones you put on your bed are pillows, but any fancy, decorative kind is a pilla. :)  

I've been having a ton of stressful deadlines lately (not quilting!), and all my assignments are currently caught up - so that means it's time to do a fun project! Kate was invited to go to a little Valentines party today, so I got a pillow from IKEA to recover in a Valentiney way for our hostess. Didn't it turn out cute?!

Whenever I make a pilla, there are a couple of tricks I do. First, I ALWAYS use a 1/2" seam - that way I can fiddle around with the seam allowance if the measurements of the form aren't quite right.

The next trick I do I learned from my Mom. Have you ever noticed that a lot of pillow covers are actually concave on the edges - the points are just a little too pointy, even though you've sewn it perfectly square. I think it has something to do with the way the stuffing fills out the pilla more towards the center, but maybe don't quote me on that. So, I really am a little particular I guess, but I want my pilla to look square. Well, Mom always tapers her corners, so the pillow looks more square.
 

I usually start about 2" away from the seam corner point, on the seam, and gradually sew on the INSIDE of the seam, until I'm about 1/4" from the seam corner. Then I turn and sew gradually until I'm about 2" away from the seam corner and on the other seam. This picture shows what I'm talking about:
 
Now, on this pilla, I accidentally only started about 1 1/2" away from the edge -- 2" or even about 2 1/2" would have been better.  You can see in the first picture, it's mostly square, but it still has a bit of that concave look.
 
The last trick I do is to zig zag inside the seam allowance, all the way around the pillow form. If I'm making an envelope closure (which is almost always), I can zig zag all the way around!  If you're using a different closure, you can just zig zag around, leaving the opening empty. Then I clip JUST the corners 1/4" away from the seam - just to let it poke out a little better. And, of course, you could absolutely use a serger and skip the corner step -- I just don't have one, or have plans of getting one.
 
I hope you try the corner trick out -- it really revolutionized my pillow making when I learned it!

Monday, February 9, 2015

BFTPqal - page 63

Hello everyone! We're back with the #BFTPqal - and this week was so much fun!  Machelle from Cherry Tree Cottage used the instructions from the book, and liberty fabrics. I don't really get the fascination with the liberty prints, because they kind of remind me of the eighties... but her blocks are really pretty! The link to that post is {here}.

I only wanted to do the applique block this week, and I had so much fun with it!  I decided to embrace my frailties, and gave up on needle turn applique.  One of the reasons we did this quilt along was to explore modern methods -- and for me, Heat-n-Bond Lite is a modern method I'm more than happy to embrace!  I was trying so hard to make the other methods of applique work (I tried three different ways), but none were giving me a result I really liked.  I will readily admit that I'm a bit of a perfectionist in lots of ways, and I just couldn't commit to a less-than-perfect product. Some might argue that Heat-n-Bond is imperfect, but I can tolerate the intentional fuzzy edges that come from this method way better than having my curves poke out in weird places, and having weird random bits of fraying threads. So, that being said -- here's my block:

Pomegranate block, page 63 

I absolutely love it!  I feel like I stayed true to the original intent of this block, but it has such modern fabrics too.  In fact, I'd even say it has a bit of an Art Deco feel to it -- would you agree?

One part I didn't use the Heat-n-Bond on was the stems.  Since I didn't know how I wanted the stems to lie, I knew I wanted to use some homemade bias tape for this project.  I described my method {here}, and it worked like a charm!  For this block, I used a 5" square, which I liked because it was a little less waste, since I am using different fabrics for all the stems.

And, true to my word, here's the "finished" block from a couple of weeks ago.

Rose Spray block, page 60

I really loved this block so much, as soon as I saw it I knew I wanted to make it.  In fact, I requested to do the first week, just because of this block! :)  But I ran into so many problems when I was trying to make it that I got a little discouraged.  I really just needed some time to figure out what to do differently, and once I did, I adhered Heat-n-Bond Lite to the back of my fabrics and went to town. I guess it must be the instant gratification of having it done quick that I like the best!

One more little note... These blocks are adhered to the white background, but not stitched down.  I decided to attach them at the same time I do the quilting, since I'm going to try my hand at some free motion quilting on this project. If you use Heat-n-Bond or something similar, you MUST sew down your applique pieces at some point in your process or the applique will fall off! Typically, I topstitch or zig zag my blocks before I even assemble the quilt top, but in this instance I will do it all in one step at the quilting phase.

Monday, February 2, 2015

BFTPqal - page 14

Whoops -- it looks like I never posted last week!  The blocks from pages 10, 11 and 61 are all blocks I didn't want for my quilt -- but Konda Luckau from Moose on the Porch Quilts did them! Konda is so so much fun -- I first met her when I went to a sewing day, but I'd followed along with her Jelly Roll Quilt Along before that. We are fellow math lovers. :) She has tips and tricks all about her blocks, and likens the applique block to running -- you'll find it all {here}.

The blocks for this week, from pages 13, 14, and 62, are being presented this week by Marion! Just as a background, I met Marion about two years ago -- and I've loved her ever since! We both went to the Cabin Fever quilt retreat that Emily Herrick put on, and I sat at her table. I was a little nervous at first -- I didn't have any idea what to expect -- but it was so much fun! And a big part of that was how welcoming Marion was. The link to Marion's blocks is {here}.

When I planned out all my blocks, I decided which ones I liked best straight on and which I liked best on point, and then I put them all in the order we were doing them. The only one I'm doing this week is from page 14 - Duck and Ducklings. I have to admit, I completely ignored Marie Henry's instructions -- I knew I wanted to make these blocks a little differently so I didn't have to work with 11/16th measurements!

Ducks and Ducklings block, page 14

I had two options -- to make the measurements nice and easy, I could make the center strips 1" finished, or I could make them 1 1/2" finished.  I decided to make them 1" finished, which makes each of the corners 2 1/2" finished.

First, I cut a background strip and a print strip (pink), each at 1 1/2" x 7". I also cut a 1 1/2" pink square. I sewed the strips together along the long edge, ironed, and cut them apart so they made four 1 1/2" x 2 1/2" two-patches.  I sewed two of the two-patches together, then added the square, to make one long strip; the other two-patches I just set aside to use later.

Then, I made my own little paper piecing patterns. First, I tore out a piece of notebook paper (just ignore the red and blue lines!). I marked four 2 1/2" squares (leave about 1" in between all the squares if you can -- it will really help you to have plenty of overlap for the 1/4" seam allowance)...

then divided them in half (at 1 1/4") both vertically and horizontally.


Next, I marked the diagonal lines,
 
and labeled where everything goes.

Do you see the "blue" squares? I squiggled out the lines I don't want to sew on -- but I was careful not to squiggle them all the way out, because I need to overshoot that line by about 1/4" with the seams when I sew on the middle creams.

See how easy it is to make your own paper piecing templates? I use them every time I have TINY piecing to do -- especially if the piecing needs to line up precisely. And then I just cut apart the squares and paper pieced -- the pink and outside cream triangle were first, then the middle triangles, then the blue flowers (see above picture for numbers if that explanation doesn't make sense!).

Last, I just put the blocks together like a nine-patch; first I made rows, then sewed them together.  I think it turned out really nice! And thank goodness -- it turned out EXACTLY 6" square!

Monday, January 19, 2015

BFTPqal - Blocks from pages 8,9, & 60

Hello everyone!  I'm so excited to share my blocks from our #BFTPqal -- it's been so fun to do these!  We decided to do every block {mostly} in order, but as an entire one-third of the blocks are applique or paper piecing, we made the schedule up so there would be two pieced blocks and one applique/paper-pieced block each week.  Spreading out all that applique sounds like a good idea to me -- it's easy to get overwhelmed by it!

Friendship Album block, page 8

I really liked the way Marie Henry laid out this block -- it just made sense to my brain! -- so I just followed her instructions.  The only thing I would change would be to cut those background squares just a leeetle bit bigger and trim down -- you can see in my photo that they're just a little too small towards the bottom. Luckily, my layout will hide any problems like that!

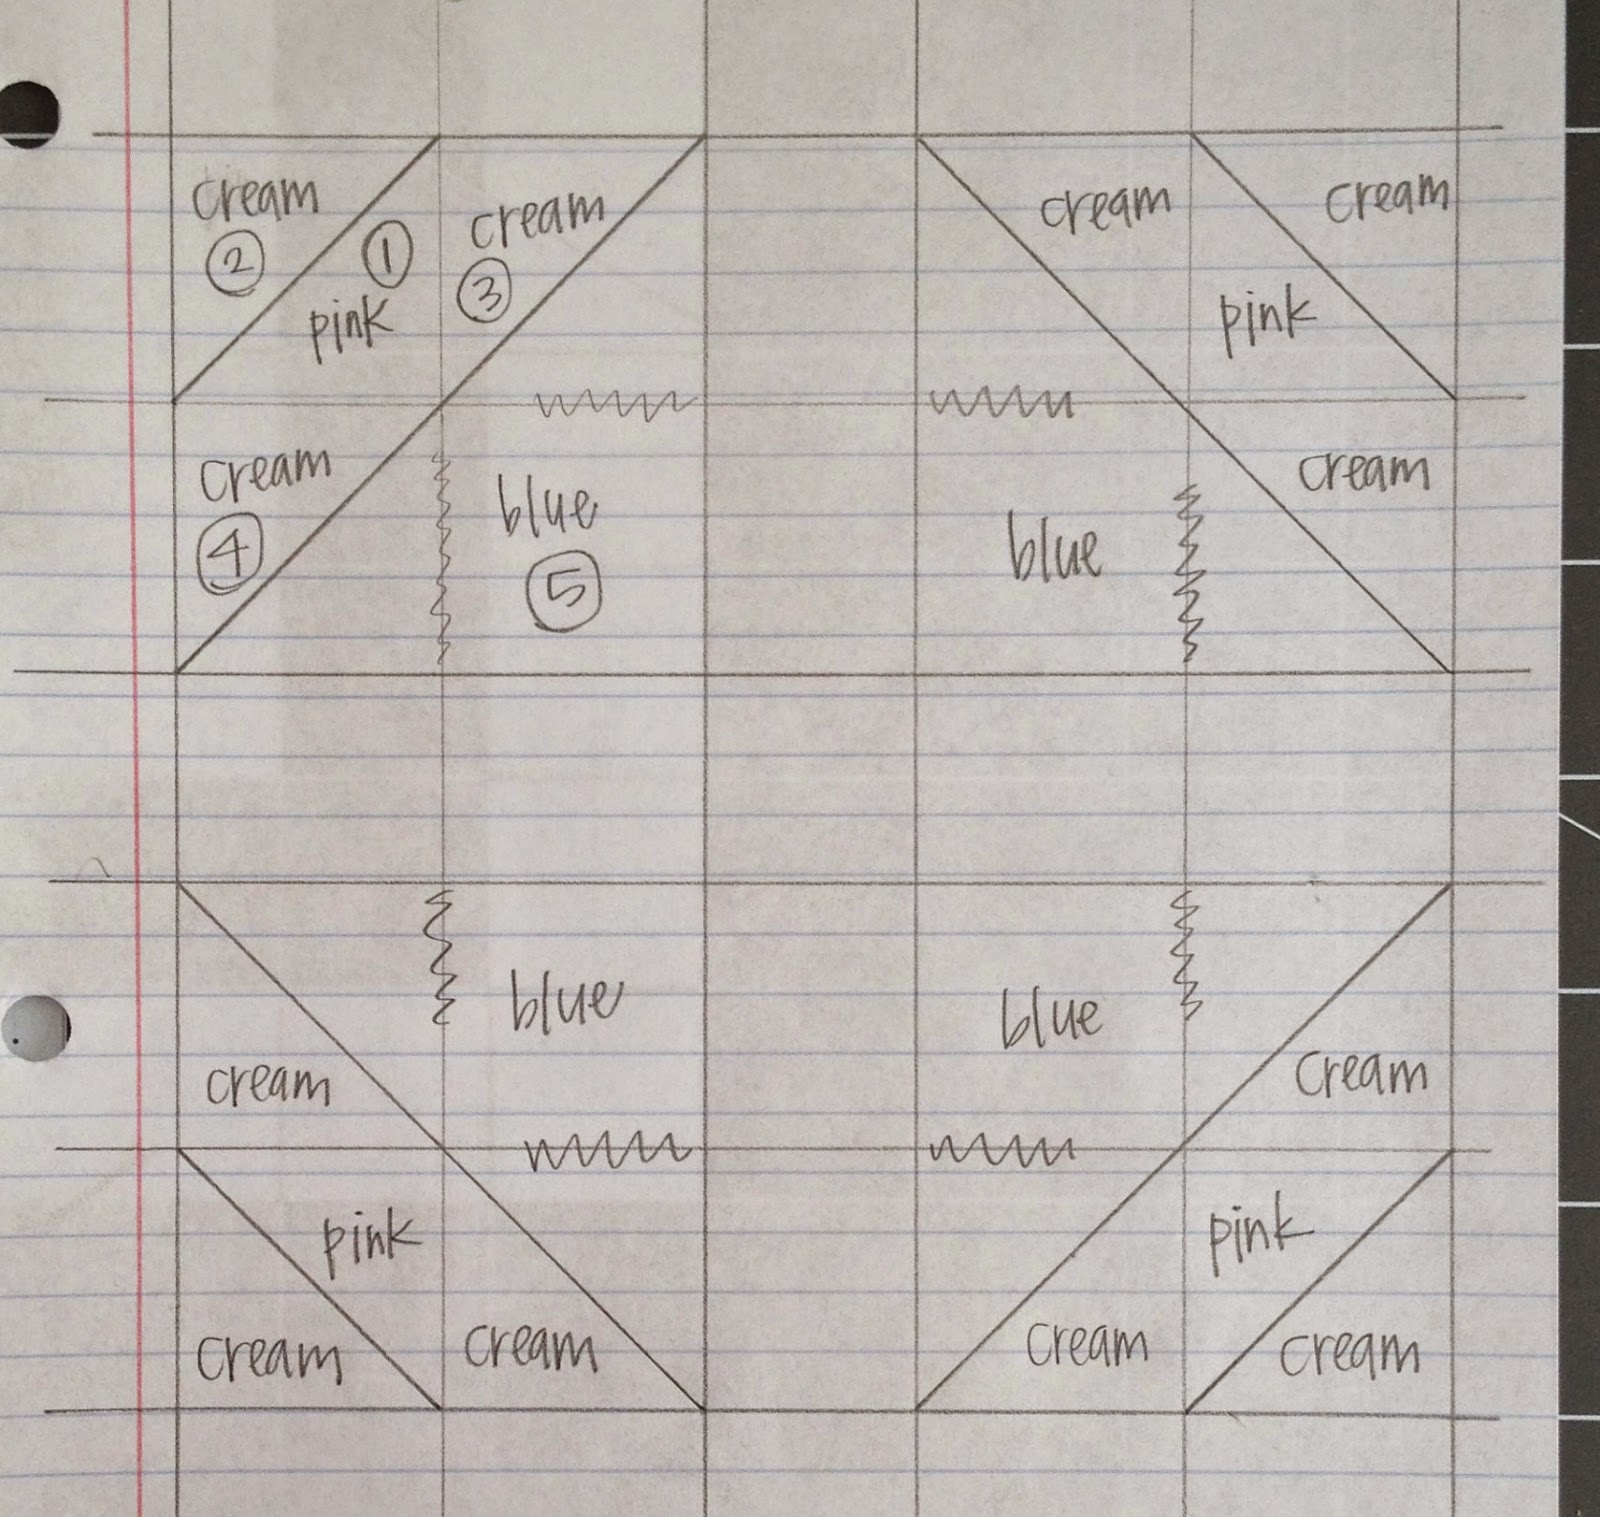
This and That block, page 9

I actually did fudge this block a little. Marie Henry's directions are very straight-forward, but I had already pieced the other block and knew I wanted a little wiggle room, so I cut waaay bigger pieces than called for (between 1/2" - 1" bigger than recommended), and cut down as I went.  The center of the block I cut exactly as she has written, though, as that's the starting off point.  The only problem I had was that when I went to cut the blocks down to 3 1/2", I didn't quite get them down that far; they're about 1/8"-1/4" off.  Again, my layout will hide the problem, but I think my issue is that my seam allowance is just a little funny. I just changed thread weights, and I'm having a hard time getting an accurate 1/4" seam -- does anyone else have that problem?

In retrospect, I should have made my own little paper piecing templates for the centers.  It would have been pretty easy to make a paper piecing template for these, and then they would have been perfect. I sometimes forget on tiny piecing that I really like to paper-piece it, because then you don't have to worry as much about accuracy -- it's already done for you!

Rose Spray block, page 60

I was thrilled to get this block -- I requested it! It's so, so old-fashioned, but I think that's what makes it so perfect for updating.  Unfortunately, we had a really tough week last week (a tragedy in our neighborhood), so I didn't get this one completed. I will revise this post when I've finished it, but for now I'd like to tell you what I did that worked -- and what didn't work -- for me.

I got my pretty flower fabric last week, and I was so happy to use it for my center on the rose block! But the more I thought about it, the more I decided I would have to use it for the buds instead -- I really wanted something with a little more punch in the center.  So I'll be using the flower fabric for the buds, and that pretty blue fabric (from Fig Tree's Avalon line) for the center.

For the center flower background (the coral dot) I will be using a starch-and-freezer-paper method.  First, I adhered three pieces of freezer paper together, then traced my image, adhered it to my fabric (the shiny side just sticks when you iron it), then cut around it leaving about 1/4". Then I sprayed starch all around the edges and ironed it around the cut edges of the freezer paper. It worked great! And will make appliqueing it quite easy. I did the center flower (the blue with flowers) the same way, but left the edges fanned out so you can see -- I cut around the inside curves, but left the outside curves mostly alone.  Of course, this is such a small piece, it looks as though most of it is cut, but I promise it's not!

For the leaves, the starch-and-freezer-paper method worked great, but I'm going to have to use another method for the calyxes (the little bit of stem that is under the rosebuds) -- they're giving me kind of a hard time!  I tried to baste them, like you would for EPP hexies, but that didn't work very well at all. I think at this point I'll probably try using a needle turn method where I mark on the top of the fabric, then finger press all along the marked line, and cut my corners as needed as I go.

For the stems, I knew they would be straight lines, but I prepared a bias binding as direction in Marie Henry's book. It was, to be frank, a disaster. I couldn't get the seam allowance small enough to work without showing, so I scrapped that piece and tried a method I learned in a Craftsy class. I cut on the bias, then used my hera marker to score a line on which I ironed. It worked so much better! I think I might be just a touch bigger than 3/16", but it looks EXACTLY as I'd hoped.

I'm not sure this block is actually going to be as "modern" as I thought it would be, but it's still going to be so pretty I can't be sorry!

UPDATED 02/09/15: The "finished" block is blogged {here}