Okay, this one is going to be EPIC! It's basically the run-down of the demo I did today for the Payson Quilt Show. I will attach my supplies list in THIS POST, but they are also scattered throughout the presentation.
Good, Old-Fashioned Hand Quilting
I started out pretty young, probably about 6 or 7, hand quilting with my mom and all the older ladies at the church. Mom was the youngest by probably 30 years -- so they really were old ladies! Sometimes we would have a quilt "on" (meaning on the frames) at my Grandma's house too -- that was always fun because my Grandma and aunts are pretty much the best people I've ever known. I loved being with older people, and I learned REALLY young that if you kept quiet, you could find out ALL SORTS of juicy things about people! :)
Back in those days, there was a bit of a stigma about machine quilting. I guess it was okay for people who wanted their quilts to look like a MACHINE did it, but if you really cared about someone you would hand quilt for them. I actually didn't even discover professional longarm quilting until my fourth child was born -- so all those three older kids' quilts were hand quilted when I was around 8 months pregnant!
When I was a teenager, I had a goal to make a quilt for the local children's hospital. I had had a cousin who was diagnosed with leukemia at 2, and I wanted to give back to that hospital that had taken such good care of her. I let my mom choose most of the fabric and pattern -- but I was able to donate the cutest little blue bear holding balloons! (I'll try to find a picture and post it later.)
After I discovered professional longarm services, I realized there were quicker and easier ways to quilt than with hand quilting. Then I learned to quilt on my OWN machine -- at first with just my walking foot, but now I'm fairly comfortable with free motion quilting too. But after a little while, I returned to hand quilting for smaller projects, and every so often the quilt just CALLS for hand quilting. I love working with my hands, it's very soothing! And each section finished feels like a victory.
With traditional hand quilting, there are five ways to sandwich your quilt. Two of them, I haven't ever used -- they are the quilting hoop and thread basting. To me, the quilting hoop just seems like something extra to store that I probably won't use, and thread basting seems so wasteful of thread and energy. I know lots of people swear by them though! The three other ways are to use quilting frames (which are far bulkier than a quilting hoop, I know! But that's how I learned originally), spray basting, and pin basting. I used quilting frames on all those baby quilts! But of the three, pin basting is my favorite -- mostly because I just LOVE the way it feels like a real quilt when you finish, and I really love that I can snuggle under that "quilt" while I'm watching a show on TV! I had the idea the other day to try pin basting from the underside of the quilt, so the pins don't catch your thread when you're sewing -- but I haven't tried that yet. You do need to be careful if you're saving that project long-term -- I believe they can rust, especially if you live in a humid environment.
The stitching method for traditional hand quilting is to do the tiniest stitches possible! It keeps the stitches strong and looks the most historical and authentic. You can do that two different ways -- by rocking the needle back and forth to take little "bites" of the fabric all at once, or by taking a one small stitch at a time and then pulling a group of three or four of them through. I usually use the second of those methods. I like that I can make the stitches really even and uniform, and I like the pucker it gives to the quilting.
When you're hand quilting, you usually use a quilter's knot. My aunt showed us all how to make one back when I was a young teenager, and it's the only way I make knots in thread any more. You wrap the thread around the needle two or three times, then pull the needle through to make a knot in the end of the thread. When I start my quilting, I generally put four or five "wraps" around the needle, and three or four at the end of the quilting.
One other thing you MUST know for all these methods of hand quilting and binding, is called burying the knot. It's basically just popping the knot through the fabric. For your thread ends to be buried, you have to use this method. When you're starting quilting, you'll take a medium-sized stitch, starting a little away from where you want the thread to come up, and then pull the needle through in the exact place you'd like to start. When the needle starts to pucker the fabric (due to the knot at the end), you pull it, while simultaneously pulling the fabric against the knot. The knot will slip in between the weave of the fabric, and be hidden in between the layers of your quilt sandwich. It takes a little practice to pull just hard enough that it goes through the fabric, without coming out the other end too -- but you'll love that all those threads are hidden! I use the same method for burying the end of the knot, too.
Hand Binding
I absolutely LOVE using my binding kit! I got it from THIS FREE TUTORIAL by Vanessa Goertzen at Lella Boutique. I made an extra little pocket for my thimble, and made it a little bigger to accommodate all my Clover Wonder Clips, but everything else is pretty much the same. Its' so nice to have everything in one place!
When I hand bind my quilts, I almost always cut my binding strips at 2 1/4", then press them in half and roll them into an oval shape to do a double-fold binding. I attach the front first, then wrap the binding around to the back. I really like to press my binding towards the outside of the quilt before I wrap it too -- I feel like it's a lot easier to make sure that seam on the back is covered if I do it that way.
I like to start in the middle of the longer side of the quilt (because then it feels like you only have one long side!), and I usually use ten "wraps" in the quilter's knot, since I don't have to bury it! It's so nice to just have it super secure. Then, when I end my thread, I make the knot and bury it at the same time.
Big Stitch Hand Quilting
I love to use this method any time I really want to show off my piecing! I have used it to outline, to go along both sides of seams, and to quilt diagonally on a quilt. I've also used it to embellish, almost like embroider -- it was particularly useful to make the "vines" on a pumpkin table runner I made last year. It goes SO FAST and it's so fun to see your quilting shine!
One small change in supplies is that you will need to use a bigger needle, with a bigger eye. This is really important, because the bigger needle and eye will "plow the road" for your thread to go through. Don't worry -- that hole you're making with a bigger needle will go in between the weave of your fabric, and will disappear in just a little bit of time.
You will also use different thread. I usually use 50 weight thread to piece my quilt tops, and either 40 or 50 weight for quilting -- but I almost always use size 8 perle cotton for big stitch quilting. You can also use size 12 perle cotton or Aurifil thread, but I really like the heft of the size 8.
As far as method goes, it's almost the opposite of traditional hand quilting. You make a bigger stitch on the top of the quilt, about 1/2" long, and as tiny as possible on the back side. Generally my back side stitch is about 1/8". You will also use less "wraps" on the quilting knot -- I usually do just one wrap around for burying the threads.
Big Stitch Binding
When you're doing big stitch binding, it is generally because you want to emphasize it! I generally use a bigger binding (although I didn't in my example) -- whatever size you want is fine, but I usually like to do it if there is a big border, so my binding can be bigger as well. If you're doing a double-fold binding, you can cut it any way you'd like -- if you use a 1/4" binding on one side, you can wrap it around and it will fold just right.
You should attach your binding to the back of the quilt (opposite of traditional hand binding), then wrap around to the front. That way you can see your pretty stitches!
One last trick is to sew under the binding, quilt top, and batting -- but not through the back of the quilt. You could "quilt" through it all, but I like the look of the stitching just being on the top side. That is how you attach a regular binding anyway, so that part of binding should feel familiar. But again -- it will go so much faster than regular binding!
And that's my little presentation! I opened it up for some questions at the end, but that's the gist. I hope you try some of these methods another time! And you can get the full supply list, and list of helpful links I've used, HERE.

Showing posts with label tips & tricks. Show all posts
Showing posts with label tips & tricks. Show all posts
Saturday, October 12, 2019

Hand Quilting & Binding - Supply List & Helpful Links
SUPPLIES:
·
Water
soluble marker
·
Size
40 or 50 thread (for good old-fashioned quilting & binding)
·
Size
8 or 12 perle cotton or embroidery floss (for big stitch hand quilting &
binding)
·
16
Dritz Embroidery needles, size 3/9 – large eye needles
RESOURCES:
Natalie
Smith’s Hand Quilting blog post:
Natalie Smith’s Hot Pad Tutorial:https://natalie-ever-after.blogspot.com/2019/10/hot-pad-tutorial.html
Vanessa Goertzen’s Binding Bag Tutorial:
https://lellaboutique.blogspot.com/2015/07/goody-goody-binding-kit.html
Simple
Quilt Frames Tutorial
PVC
Quilt Frame Tutorial
Sarah
Fielke’s Hand Quilting Techniques for Beginners
Erica
Jackman’s Big Stitch Binding Tutorial
Monday, July 13, 2015
#BFTPqal - Finished Top

I finished my Blocks from the Past quilt top! I'm pretty proud of myself -- I really wanted to do a big, fat sampler quilt (a la Camille Roskelley's Farmer's Wife quilt), but I've come to peace with a "time and a season" mentality, and it's just not the time or season for this project. I'm so glad I've done as much as I have, though, because someday it will be my time & season, and when it comes I'll remember all my mistakes! :)
If I had it all to do over again, I'd definitely make this quilt differently than prescribed in the book -- almost every block that I made with Marie Henry's instructions had major problems. A few were too big, so I had to chop off my points, and one was almost 1/2" too small -- and I was REALLY careful with that one! For the most part, I'd probably paper-piece most of these blocks. If you do that, you end up with a perfectly sized block, with minimal mistakes.
One thing I'm super pleased with, however, is how I went out of my comfort zone color-wise. I used a whole lot of colors I wouldn't normally use together, and BLACK -- I've only made one other quilt with black, and it was a black-and-white quilt! There are a couple of blocks I'd change if I hated them more, but all things considered, I love it!

(Isn't this a lovely artsy shot? I've been playing around with my camera a bit, and it's really fun to try new compositions! For example, in this shot you can't tell that my sewing room is a COMPLETE DISASTER...)
One little trick I have is to make the binding after I'm finished with a quilt, especially if I'm doing a scrappy binding. If I make a regular binding, I don't mind making the it before I start the quilt, but with a scrappy one I'm always nervous I won't have enough fabric for my quilt top if I make the binding first. BUT... if I don't make the binding right after I've made the quilt, then I have to keep all that lovely fabric separate from my regular fabric stash, and I can't use it for anything else! So, I measure the sides of the quilt, add 15-20", and make enough binding to cover the quilt, give or take a couple of inches. Then I can stuff it into my fabric bins neatly put away my fabric, and I'm all ready for another project!
Monday, July 6, 2015
#BFTPqal -- Layout and Setting
The first thing I did to lay out this quilt was to put everything up on my design wall, and arrange the blocks the way it looks most pleasing to me.
Next, I decided to use a white sashing, so I cut as many as I needed, exactly as it said in the book. I played around with the idea of using the prints for sashing and having plain white squares, but now that I’ve laid it all out, I’m super pleased with how it’s going!
Before I cut them all out, I arranged the prints on my design wall, with the blocks in the middle.

Once I found an arrangement I liked, I took a picture so I wouldn’t forget my order (have I ever mentioned that I’m a little OCD when I’m laying out everything? I guess I’ve made plenty of mistakes and want to get those out in the planning phase).

I decided to make my setting triangles a little bit bigger than in the book, just for insurance, so I cut out my corner triangles with 6 ¾” sides (cut on the diagonal).
For the side setting triangles, I cut my fabric roughly 5 ½” x 11”, then arranged them on my cutting mat so the outer side was along a 1” mark on my mat. I’ll be honest, I wasn’t too picky about which side was “up”, but if you’re wanting to be careful about it, then the outer side of the setting triangle should be at the top of your cutting area. Also, please disregard the bottom fabrics – I wanted to lose as little as possible to waste, so I used some funky-shaped pieces, and they’re a little special. :) I lined up the left edge so the top corner was on or close to a place on the mat where the 45-degree angle is intersecting a 1” mark, then cut on that 45-degree line.
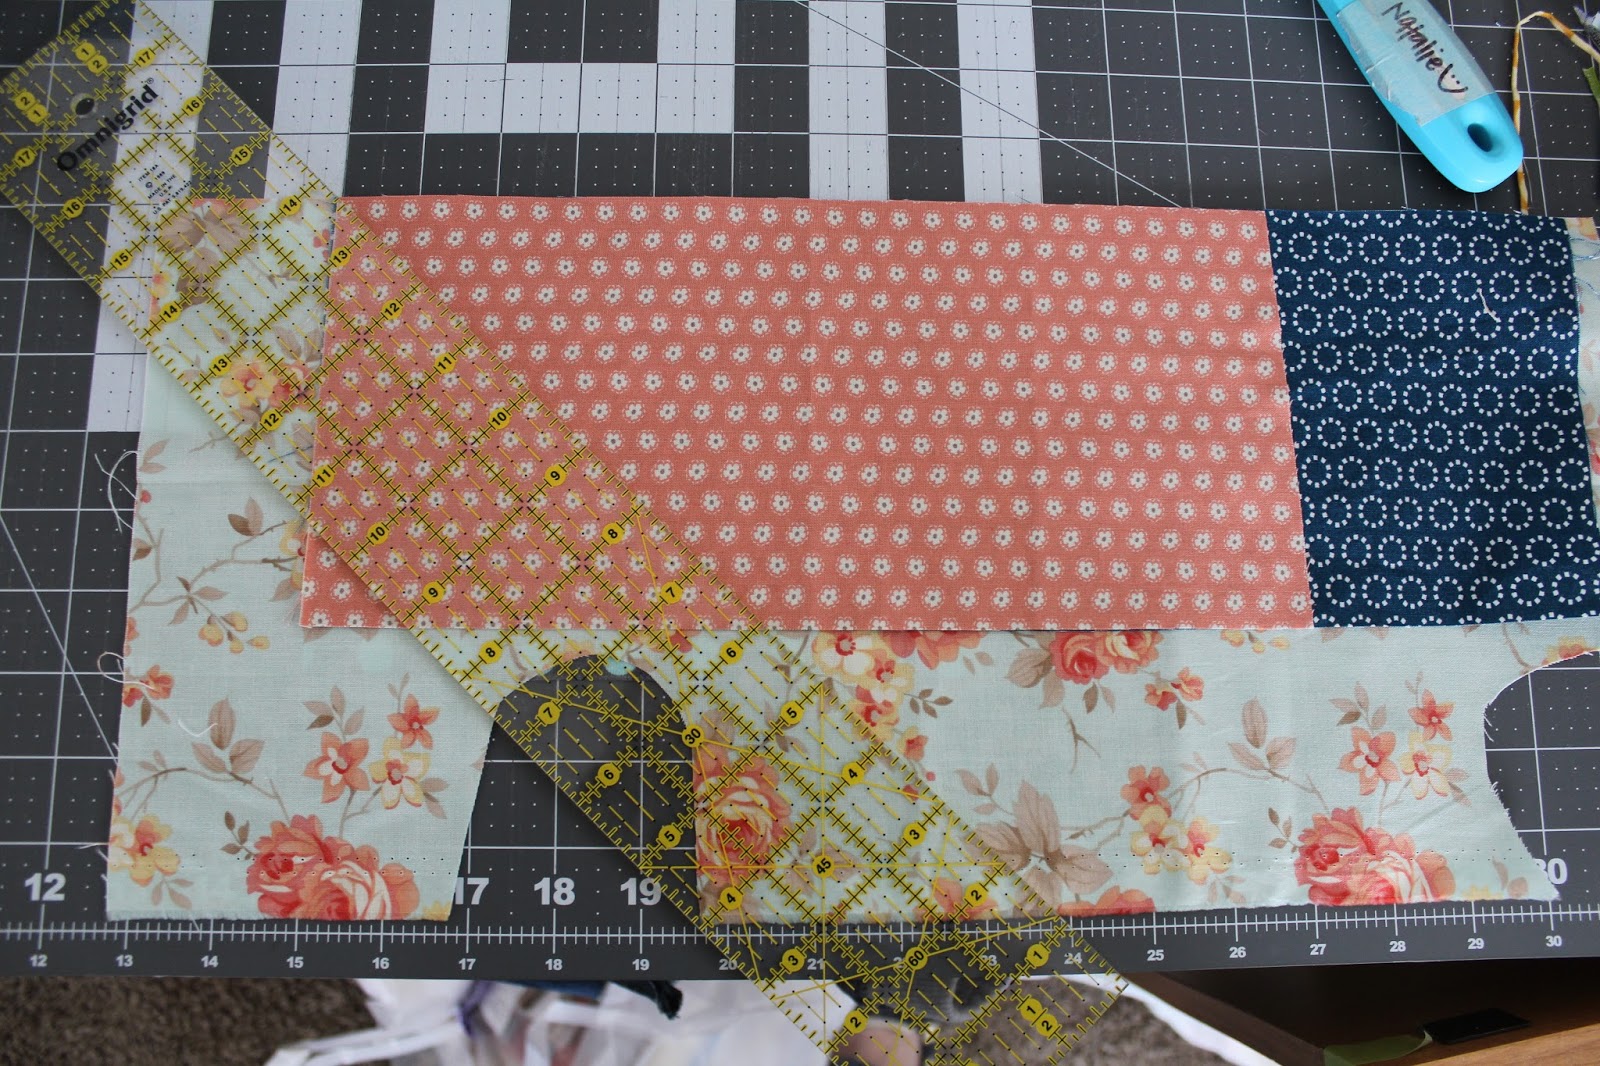
Then I measured over 11” along the top line, and made sure the other edge of my ruler was 5 ½” away from the top edge of the fabric.

That makes a perfectly square, bias-in-the-right-place, cute corner setting triangle, a little bit bigger than it needs to be so I have a little playing room when it comes time for quilting.
And here’s the finished layout:

I can’t wait to get this pretty little quilt top done! But I have a couple of other deadlines that need to be met first, so I’ll be showing off the top next week, when Marion rounds up the last little bit of this fun project. I can’t wait to see how everyone’s quilts have turned out!
Thursday, February 12, 2015
Pillas
My first job ever (besides babysitting) was at a cute little consignment shop called The Quilted Quacker. It had booths in the front, that people around town would rent out to sell their crafts, and the back third was a Christian bookstore. The owner, Regina, was from Katy, Texas and had the strongest accent! She was a real sweetheart with a heart of gold, and I just loved working for her. She always made the shop super cute, and always had some potpourri scattered throughout the store.


Regina had a friend who was also from Katy, and she just loooved "pillas". My sister and I thought she said it so cute, that we started saying it that way too! The ones you put on your bed are pillows, but any fancy, decorative kind is a pilla. :)
I've been having a ton of stressful deadlines lately (not quilting!), and all my assignments are currently caught up - so that means it's time to do a fun project! Kate was invited to go to a little Valentines party today, so I got a pillow from IKEA to recover in a Valentiney way for our hostess. Didn't it turn out cute?!
Whenever I make a pilla, there are a couple of tricks I do. First, I ALWAYS use a 1/2" seam - that way I can fiddle around with the seam allowance if the measurements of the form aren't quite right.
The next trick I do I learned from my Mom. Have you ever noticed that a lot of pillow covers are actually concave on the edges - the points are just a little too pointy, even though you've sewn it perfectly square. I think it has something to do with the way the stuffing fills out the pilla more towards the center, but maybe don't quote me on that. So, I really am a little particular I guess, but I want my pilla to look square. Well, Mom always tapers her corners, so the pillow looks more square.
I usually start about 2" away from the seam corner point, on the seam, and gradually sew on the INSIDE of the seam, until I'm about 1/4" from the seam corner. Then I turn and sew gradually until I'm about 2" away from the seam corner and on the other seam. This picture shows what I'm talking about:
Now, on this pilla, I accidentally only started about 1 1/2" away from the edge -- 2" or even about 2 1/2" would have been better. You can see in the first picture, it's mostly square, but it still has a bit of that concave look.
The last trick I do is to zig zag inside the seam allowance, all the way around the pillow form. If I'm making an envelope closure (which is almost always), I can zig zag all the way around! If you're using a different closure, you can just zig zag around, leaving the opening empty. Then I clip JUST the corners 1/4" away from the seam - just to let it poke out a little better. And, of course, you could absolutely use a serger and skip the corner step -- I just don't have one, or have plans of getting one.
I hope you try the corner trick out -- it really revolutionized my pillow making when I learned it!
Monday, February 2, 2015
BFTPqal - page 14
Whoops -- it looks like I never posted last week! The blocks from pages 10, 11 and 61 are all blocks I didn't want for my quilt -- but Konda Luckau from Moose on the Porch Quilts did them! Konda is so so much fun -- I first met her when I went to a sewing day, but I'd followed along with her Jelly Roll Quilt Along before that. We are fellow math lovers. :) She has tips and tricks all about her blocks, and likens the applique block to running -- you'll find it all {here}.
The blocks for this week, from pages 13, 14, and 62, are being presented this week by Marion! Just as a background, I met Marion about two years ago -- and I've loved her ever since! We both went to the Cabin Fever quilt retreat that Emily Herrick put on, and I sat at her table. I was a little nervous at first -- I didn't have any idea what to expect -- but it was so much fun! And a big part of that was how welcoming Marion was. The link to Marion's blocks is {here}.
When I planned out all my blocks, I decided which ones I liked best straight on and which I liked best on point, and then I put them all in the order we were doing them. The only one I'm doing this week is from page 14 - Duck and Ducklings. I have to admit, I completely ignored Marie Henry's instructions -- I knew I wanted to make these blocks a little differently so I didn't have to work with 11/16th measurements!

I had two options -- to make the measurements nice and easy, I could make the center strips 1" finished, or I could make them 1 1/2" finished. I decided to make them 1" finished, which makes each of the corners 2 1/2" finished.
First, I cut a background strip and a print strip (pink), each at 1 1/2" x 7". I also cut a 1 1/2" pink square. I sewed the strips together along the long edge, ironed, and cut them apart so they made four 1 1/2" x 2 1/2" two-patches. I sewed two of the two-patches together, then added the square, to make one long strip; the other two-patches I just set aside to use later.

Then, I made my own little paper piecing patterns. First, I tore out a piece of notebook paper (just ignore the red and blue lines!). I marked four 2 1/2" squares (leave about 1" in between all the squares if you can -- it will really help you to have plenty of overlap for the 1/4" seam allowance)...

then divided them in half (at 1 1/4") both vertically and horizontally.

Next, I marked the diagonal lines,
 and labeled where everything goes.
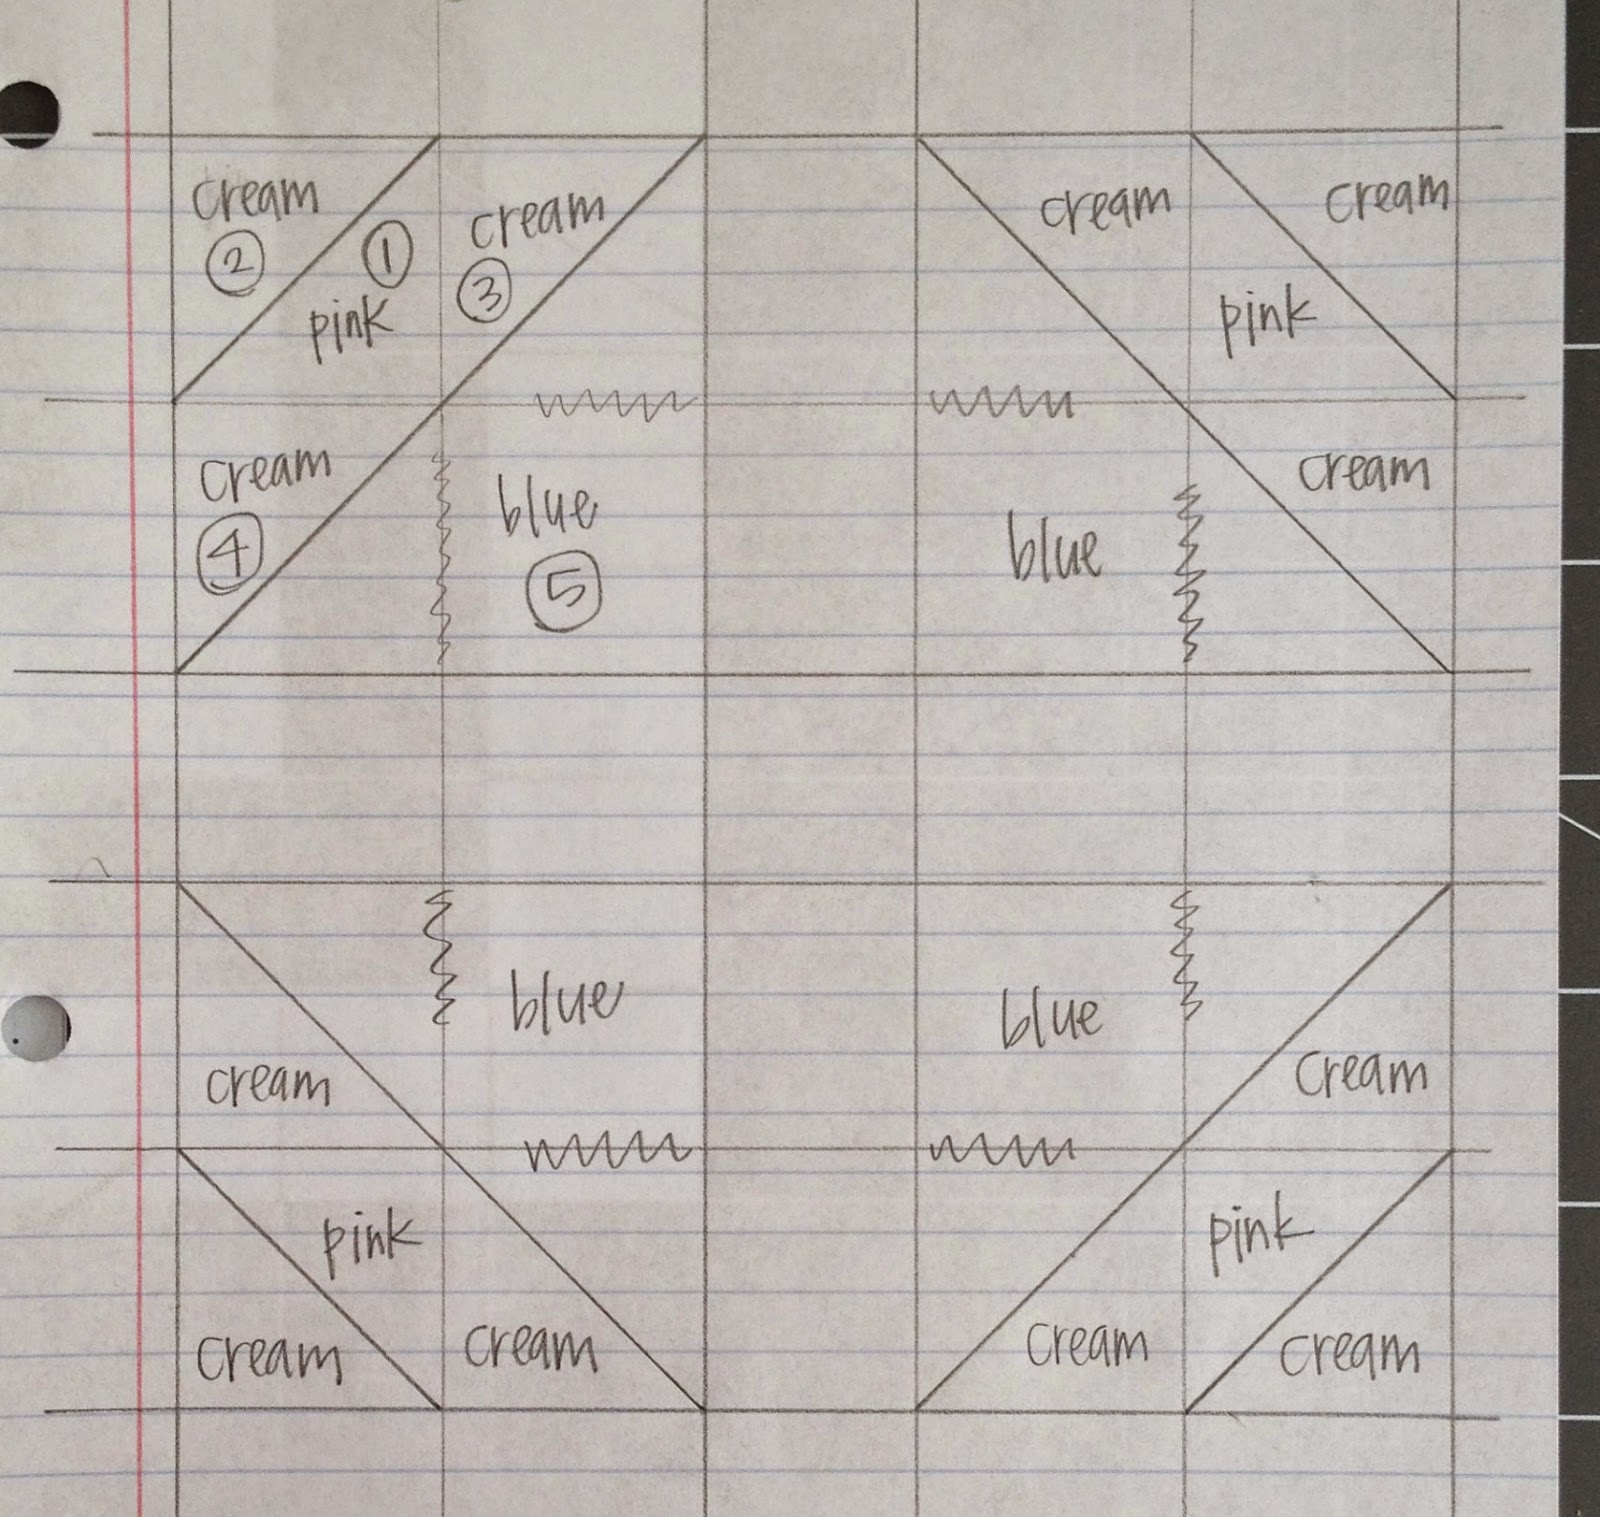
Do you see the "blue" squares? I squiggled out the lines I don't want to sew on -- but I was careful not to squiggle them all the way out, because I need to overshoot that line by about 1/4" with the seams when I sew on the middle creams.
See how easy it is to make your own paper piecing templates? I use them every time I have TINY piecing to do -- especially if the piecing needs to line up precisely. And then I just cut apart the squares and paper pieced -- the pink and outside cream triangle were first, then the middle triangles, then the blue flowers (see above picture for numbers if that explanation doesn't make sense!).
Last, I just put the blocks together like a nine-patch; first I made rows, then sewed them together. I think it turned out really nice! And thank goodness -- it turned out EXACTLY 6" square!
The blocks for this week, from pages 13, 14, and 62, are being presented this week by Marion! Just as a background, I met Marion about two years ago -- and I've loved her ever since! We both went to the Cabin Fever quilt retreat that Emily Herrick put on, and I sat at her table. I was a little nervous at first -- I didn't have any idea what to expect -- but it was so much fun! And a big part of that was how welcoming Marion was. The link to Marion's blocks is {here}.
When I planned out all my blocks, I decided which ones I liked best straight on and which I liked best on point, and then I put them all in the order we were doing them. The only one I'm doing this week is from page 14 - Duck and Ducklings. I have to admit, I completely ignored Marie Henry's instructions -- I knew I wanted to make these blocks a little differently so I didn't have to work with 11/16th measurements!
Ducks and Ducklings block, page 14
I had two options -- to make the measurements nice and easy, I could make the center strips 1" finished, or I could make them 1 1/2" finished. I decided to make them 1" finished, which makes each of the corners 2 1/2" finished.
First, I cut a background strip and a print strip (pink), each at 1 1/2" x 7". I also cut a 1 1/2" pink square. I sewed the strips together along the long edge, ironed, and cut them apart so they made four 1 1/2" x 2 1/2" two-patches. I sewed two of the two-patches together, then added the square, to make one long strip; the other two-patches I just set aside to use later.
Then, I made my own little paper piecing patterns. First, I tore out a piece of notebook paper (just ignore the red and blue lines!). I marked four 2 1/2" squares (leave about 1" in between all the squares if you can -- it will really help you to have plenty of overlap for the 1/4" seam allowance)...
then divided them in half (at 1 1/4") both vertically and horizontally.
Next, I marked the diagonal lines,
Do you see the "blue" squares? I squiggled out the lines I don't want to sew on -- but I was careful not to squiggle them all the way out, because I need to overshoot that line by about 1/4" with the seams when I sew on the middle creams.
See how easy it is to make your own paper piecing templates? I use them every time I have TINY piecing to do -- especially if the piecing needs to line up precisely. And then I just cut apart the squares and paper pieced -- the pink and outside cream triangle were first, then the middle triangles, then the blue flowers (see above picture for numbers if that explanation doesn't make sense!).
Last, I just put the blocks together like a nine-patch; first I made rows, then sewed them together. I think it turned out really nice! And thank goodness -- it turned out EXACTLY 6" square!
Monday, January 19, 2015
BFTPqal - Blocks from pages 8,9, & 60
Hello everyone! I'm so excited to share my blocks from our #BFTPqal -- it's been so fun to do these! We decided to do every block {mostly} in order, but as an entire one-third of the blocks are applique or paper piecing, we made the schedule up so there would be two pieced blocks and one applique/paper-pieced block each week. Spreading out all that applique sounds like a good idea to me -- it's easy to get overwhelmed by it!

I really liked the way Marie Henry laid out this block -- it just made sense to my brain! -- so I just followed her instructions. The only thing I would change would be to cut those background squares just a leeetle bit bigger and trim down -- you can see in my photo that they're just a little too small towards the bottom. Luckily, my layout will hide any problems like that!

I actually did fudge this block a little. Marie Henry's directions are very straight-forward, but I had already pieced the other block and knew I wanted a little wiggle room, so I cut waaay bigger pieces than called for (between 1/2" - 1" bigger than recommended), and cut down as I went. The center of the block I cut exactly as she has written, though, as that's the starting off point. The only problem I had was that when I went to cut the blocks down to 3 1/2", I didn't quite get them down that far; they're about 1/8"-1/4" off. Again, my layout will hide the problem, but I think my issue is that my seam allowance is just a little funny. I just changed thread weights, and I'm having a hard time getting an accurate 1/4" seam -- does anyone else have that problem?
In retrospect, I should have made my own little paper piecing templates for the centers. It would have been pretty easy to make a paper piecing template for these, and then they would have been perfect. I sometimes forget on tiny piecing that I really like to paper-piece it, because then you don't have to worry as much about accuracy -- it's already done for you!

I was thrilled to get this block -- I requested it! It's so, so old-fashioned, but I think that's what makes it so perfect for updating. Unfortunately, we had a really tough week last week (a tragedy in our neighborhood), so I didn't get this one completed. I will revise this post when I've finished it, but for now I'd like to tell you what I did that worked -- and what didn't work -- for me.
I got my pretty flower fabric last week, and I was so happy to use it for my center on the rose block! But the more I thought about it, the more I decided I would have to use it for the buds instead -- I really wanted something with a little more punch in the center. So I'll be using the flower fabric for the buds, and that pretty blue fabric (from Fig Tree's Avalon line) for the center.
For the center flower background (the coral dot) I will be using a starch-and-freezer-paper method. First, I adhered three pieces of freezer paper together, then traced my image, adhered it to my fabric (the shiny side just sticks when you iron it), then cut around it leaving about 1/4". Then I sprayed starch all around the edges and ironed it around the cut edges of the freezer paper. It worked great! And will make appliqueing it quite easy. I did the center flower (the blue with flowers) the same way, but left the edges fanned out so you can see -- I cut around the inside curves, but left the outside curves mostly alone. Of course, this is such a small piece, it looks as though most of it is cut, but I promise it's not!
For the leaves, the starch-and-freezer-paper method worked great, but I'm going to have to use another method for the calyxes (the little bit of stem that is under the rosebuds) -- they're giving me kind of a hard time! I tried to baste them, like you would for EPP hexies, but that didn't work very well at all. I think at this point I'll probably try using a needle turn method where I mark on the top of the fabric, then finger press all along the marked line, and cut my corners as needed as I go.
For the stems, I knew they would be straight lines, but I prepared a bias binding as direction in Marie Henry's book. It was, to be frank, a disaster. I couldn't get the seam allowance small enough to work without showing, so I scrapped that piece and tried a method I learned in a Craftsy class. I cut on the bias, then used my hera marker to score a line on which I ironed. It worked so much better! I think I might be just a touch bigger than 3/16", but it looks EXACTLY as I'd hoped.
I'm not sure this block is actually going to be as "modern" as I thought it would be, but it's still going to be so pretty I can't be sorry!
UPDATED 02/09/15: The "finished" block is blogged {here}

Friendship Album block, page 8
I really liked the way Marie Henry laid out this block -- it just made sense to my brain! -- so I just followed her instructions. The only thing I would change would be to cut those background squares just a leeetle bit bigger and trim down -- you can see in my photo that they're just a little too small towards the bottom. Luckily, my layout will hide any problems like that!
This and That block, page 9
In retrospect, I should have made my own little paper piecing templates for the centers. It would have been pretty easy to make a paper piecing template for these, and then they would have been perfect. I sometimes forget on tiny piecing that I really like to paper-piece it, because then you don't have to worry as much about accuracy -- it's already done for you!
Rose Spray block, page 60
I was thrilled to get this block -- I requested it! It's so, so old-fashioned, but I think that's what makes it so perfect for updating. Unfortunately, we had a really tough week last week (a tragedy in our neighborhood), so I didn't get this one completed. I will revise this post when I've finished it, but for now I'd like to tell you what I did that worked -- and what didn't work -- for me.
I got my pretty flower fabric last week, and I was so happy to use it for my center on the rose block! But the more I thought about it, the more I decided I would have to use it for the buds instead -- I really wanted something with a little more punch in the center. So I'll be using the flower fabric for the buds, and that pretty blue fabric (from Fig Tree's Avalon line) for the center.
For the center flower background (the coral dot) I will be using a starch-and-freezer-paper method. First, I adhered three pieces of freezer paper together, then traced my image, adhered it to my fabric (the shiny side just sticks when you iron it), then cut around it leaving about 1/4". Then I sprayed starch all around the edges and ironed it around the cut edges of the freezer paper. It worked great! And will make appliqueing it quite easy. I did the center flower (the blue with flowers) the same way, but left the edges fanned out so you can see -- I cut around the inside curves, but left the outside curves mostly alone. Of course, this is such a small piece, it looks as though most of it is cut, but I promise it's not!
For the leaves, the starch-and-freezer-paper method worked great, but I'm going to have to use another method for the calyxes (the little bit of stem that is under the rosebuds) -- they're giving me kind of a hard time! I tried to baste them, like you would for EPP hexies, but that didn't work very well at all. I think at this point I'll probably try using a needle turn method where I mark on the top of the fabric, then finger press all along the marked line, and cut my corners as needed as I go.
For the stems, I knew they would be straight lines, but I prepared a bias binding as direction in Marie Henry's book. It was, to be frank, a disaster. I couldn't get the seam allowance small enough to work without showing, so I scrapped that piece and tried a method I learned in a Craftsy class. I cut on the bias, then used my hera marker to score a line on which I ironed. It worked so much better! I think I might be just a touch bigger than 3/16", but it looks EXACTLY as I'd hoped.
I'm not sure this block is actually going to be as "modern" as I thought it would be, but it's still going to be so pretty I can't be sorry!
UPDATED 02/09/15: The "finished" block is blogged {here}
Thursday, January 15, 2015
Sampler Quilt Layout & Background Fabric Requirement
CHANGING IT UP
Something that threw a little wrench in my plans for this quilt along was the fact that I really don't love all of the blocks. I think some of them just don't "speak" to me -- so I only want to do about 44 of the blocks. But we don't really need to do ALL the blocks, because we've got so many other quilters that will be guest posting their blocks. Plus, I don't have the time to do three blocks a week AND do other projects, and I don't need another twin-sized quilt -- so I'll just make this a lap-size and only do the blocks I really love. :)
{caveat: I was assigned 12 blocks, so some of those I'll love just as much, and some I'll probably only like... but the ones that take more work (read: applique) are definitely all ones I love!}
Okay, so now that I've realized I don't want to do everything, and I'm maybe going to change up the layout... where do I start? I always start with how big I'll be making the finished product, and work my way backwards. Since the finished product's borders can vary quite a bit, I'm going to pretend they just aren't there, and just work on the center of the quilt.
Because of the size of the blocks -- a teensy 6" finished -- I decided I wanted to use a little more background fabric and create some blank space for my eye to rest. The first layout idea is very similar to the layout Marie Henry used, but instead of filling each space with blocks, the "in between" blocks will be background fabric. I used a similar layout in my Peteetneet Quilt show challenge fabric entry, blogged in my intro to the quilt along here. I laid everything out in my super-high-tech quilt layout program (Excel for Windows), and took a screenshot:
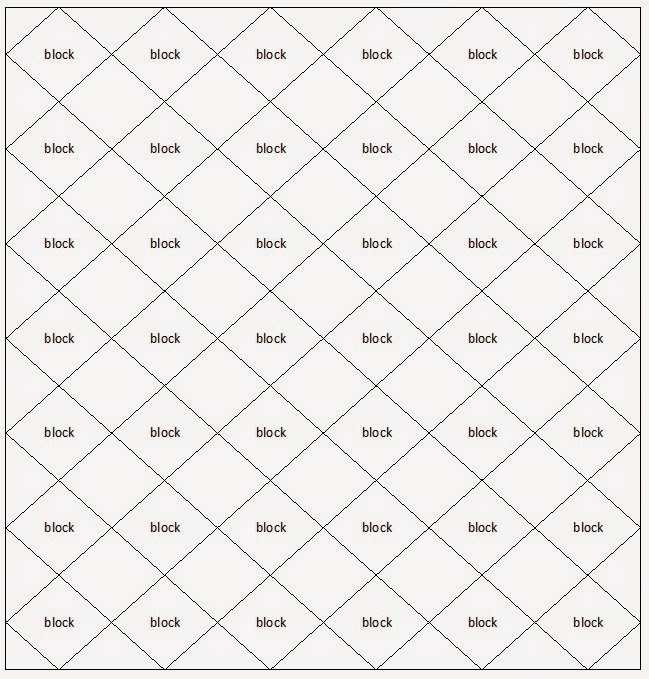
The fun part about this layout is that you can do the same amount of blocks as the original, and your quilt will have a very similar feel to the original layout -- but you'll only have to do 42 blocks instead of 72!
I had another idea, too -- one I'd seen in some of the Farmer's Wife quilt layouts, and really liked. Plus, the BEST part is that, because I really prefer most of the blocks straight-on, instead of turned on point, I could have the best of BOTH worlds! :) I laid it out in my "quilting" program again, and took another screenshot:
 I really like it! I used my trusty old Pythagorean Theorem (a-squared plus b-squared = c-squared) to figure out the block size (about 8 1/2" finished), and went from there. Who ever said you would use math in your grown-up life was sure right about quilters!
CALCULATING THE BACKGROUND FABRIC
Now that I've decided on layout, I need to figure out how much fabric EACH block will use, and how much of that measurement I can get from a width of fabric. I took a screenshot of how my brain works -- I really do have to write down every step of the problem, because I like to check my work at the end to really make sure it's right.
 Now, I am only human. And I'll be honest -- I didn't bother checking my work this time. Also, it's entirely possible my Pythagorean Theorem won't work out quite right -- it was an estimate, after all. But I'm figuring the half-squares the same way you figure half-squares for a HST block, so I think I'm pretty close to right. And in this case, close enough is good enough (what famous quilter says that ALL THE TIME? I just love her! And you get ten points if you guess right!). I'm just wanting an estimate so I know how much yardage to buy, and I'll estimate a little high just to be on the safe side anyway -- I can always use more background fabric!
Plus, this little measurement estimator doesn't take into account the fact that almost every block has some sort of "background" fabric in it -- she used mostly prints, but I really like the idea of using that same background fabric so my blocks are floating. So, instead of taking that 1 3/4 yd. total, I'll add another yard and a quarter to make about 3 yds. -- and that's about how much I'll set aside for my quilt top.
One thing's for sure -- I will be making testers for each block BEFORE I cut out all my strips, but I'll let you know all about that next week, when I post about making my first blocks. It's going to be so fun!
Something that threw a little wrench in my plans for this quilt along was the fact that I really don't love all of the blocks. I think some of them just don't "speak" to me -- so I only want to do about 44 of the blocks. But we don't really need to do ALL the blocks, because we've got so many other quilters that will be guest posting their blocks. Plus, I don't have the time to do three blocks a week AND do other projects, and I don't need another twin-sized quilt -- so I'll just make this a lap-size and only do the blocks I really love. :)
{caveat: I was assigned 12 blocks, so some of those I'll love just as much, and some I'll probably only like... but the ones that take more work (read: applique) are definitely all ones I love!}
Okay, so now that I've realized I don't want to do everything, and I'm maybe going to change up the layout... where do I start? I always start with how big I'll be making the finished product, and work my way backwards. Since the finished product's borders can vary quite a bit, I'm going to pretend they just aren't there, and just work on the center of the quilt.
Because of the size of the blocks -- a teensy 6" finished -- I decided I wanted to use a little more background fabric and create some blank space for my eye to rest. The first layout idea is very similar to the layout Marie Henry used, but instead of filling each space with blocks, the "in between" blocks will be background fabric. I used a similar layout in my Peteetneet Quilt show challenge fabric entry, blogged in my intro to the quilt along here. I laid everything out in my super-high-tech quilt layout program (Excel for Windows), and took a screenshot:
The fun part about this layout is that you can do the same amount of blocks as the original, and your quilt will have a very similar feel to the original layout -- but you'll only have to do 42 blocks instead of 72!
I had another idea, too -- one I'd seen in some of the Farmer's Wife quilt layouts, and really liked. Plus, the BEST part is that, because I really prefer most of the blocks straight-on, instead of turned on point, I could have the best of BOTH worlds! :) I laid it out in my "quilting" program again, and took another screenshot:
CALCULATING THE BACKGROUND FABRIC
Now that I've decided on layout, I need to figure out how much fabric EACH block will use, and how much of that measurement I can get from a width of fabric. I took a screenshot of how my brain works -- I really do have to write down every step of the problem, because I like to check my work at the end to really make sure it's right.
Plus, this little measurement estimator doesn't take into account the fact that almost every block has some sort of "background" fabric in it -- she used mostly prints, but I really like the idea of using that same background fabric so my blocks are floating. So, instead of taking that 1 3/4 yd. total, I'll add another yard and a quarter to make about 3 yds. -- and that's about how much I'll set aside for my quilt top.
One thing's for sure -- I will be making testers for each block BEFORE I cut out all my strips, but I'll let you know all about that next week, when I post about making my first blocks. It's going to be so fun!
Monday, January 12, 2015
#BFTPqal - Fabric Requirements & Selection
Hurray -- we're well on our way to the Blocks From the Past Quilt Along! I'm so excited -- and let me just remind you, my friends and I will be posting my progress in realtime on Instagram using the hashtag #BFTPqal. :)
FABRIC REQUIREMENTS (a.k.a. the MATH)
The fabric requirements really threw me for a loop with this project -- the fabric requirements for the sashing and border are listed on page 5, but basically Marie Henry says there's no way to calculate how much yardage you'll need, because you're doing one block at a time, and because it's such a scrappy quilt. I'm a HUGE planner, so I like to know how much fabric I need right from the get-go. I think the biggest reason for this is that I don't want to buy too much fabric -- I know, there's no such thing! -- because my fabric budget is pretty tiny. I can't be too sad, though -- we're trying to pay off all our debt, and I'm looking at the long-term. I figure by the time we get all our debt (except the mortgage) paid off, my kids will all be in school, and I'll want a bigger fabric budget because I'll have more time to sew! {My mother says that isn't really the way it works, but I'm still holding on to that dream. :)} Anyway, I don't want to buy too little fabric either, because then you either run out and have to use something that doesn't really go, or you have to rearrange things somehow.
I'll talk a little later this week about how I'm going to lay out my quilt and calculate my background fabric, but for this post not to be TOO epic, I'll just talk about the colored fabrics here. They're the most fun anyway! :) I needed an estimate of how much fabric might be needed, so what I did was take all the fabric requirements for the first two blocks, and played around with cutting them out of a fat eighth.* I figured I could easily get two blocks out of a fat eighth, and four blocks out of a fat quarter.
*a fat eighth is a cut of fabric that is about 9"X21", give or take an inch;
a fat quarter is a cut of fabric that is about 18"X21"
So, the math is like this:
FAT EIGHTH REQUIREMENT = # of blocks you'll sew DIVIDED BY TWO
FAT QUARTER REQUIREMENT = # of blocks you'll sew DIVIDED BY FOUR
So, if you're doing all 72 blocks, you would need 36 fat eighths or 18 fat quarters.
{Please note, this is a GENEROUS estimate for the quilt blocks and cornerstones -- you could probably get away with a few less pieces of fabric, but I really hate running out. And love having a lot of variation in my scrappy quilt.}
And if you're pulling fabrics from your scrap bin for this project, I'm with Marie on this one -- I probably won't ever be able to guess how much fabric you'll use!
FABRIC SELECTION
Let's be honest -- this part is so much fun!! And that's what I found when I was pulling fabric from my stash. I just couldn't stop!
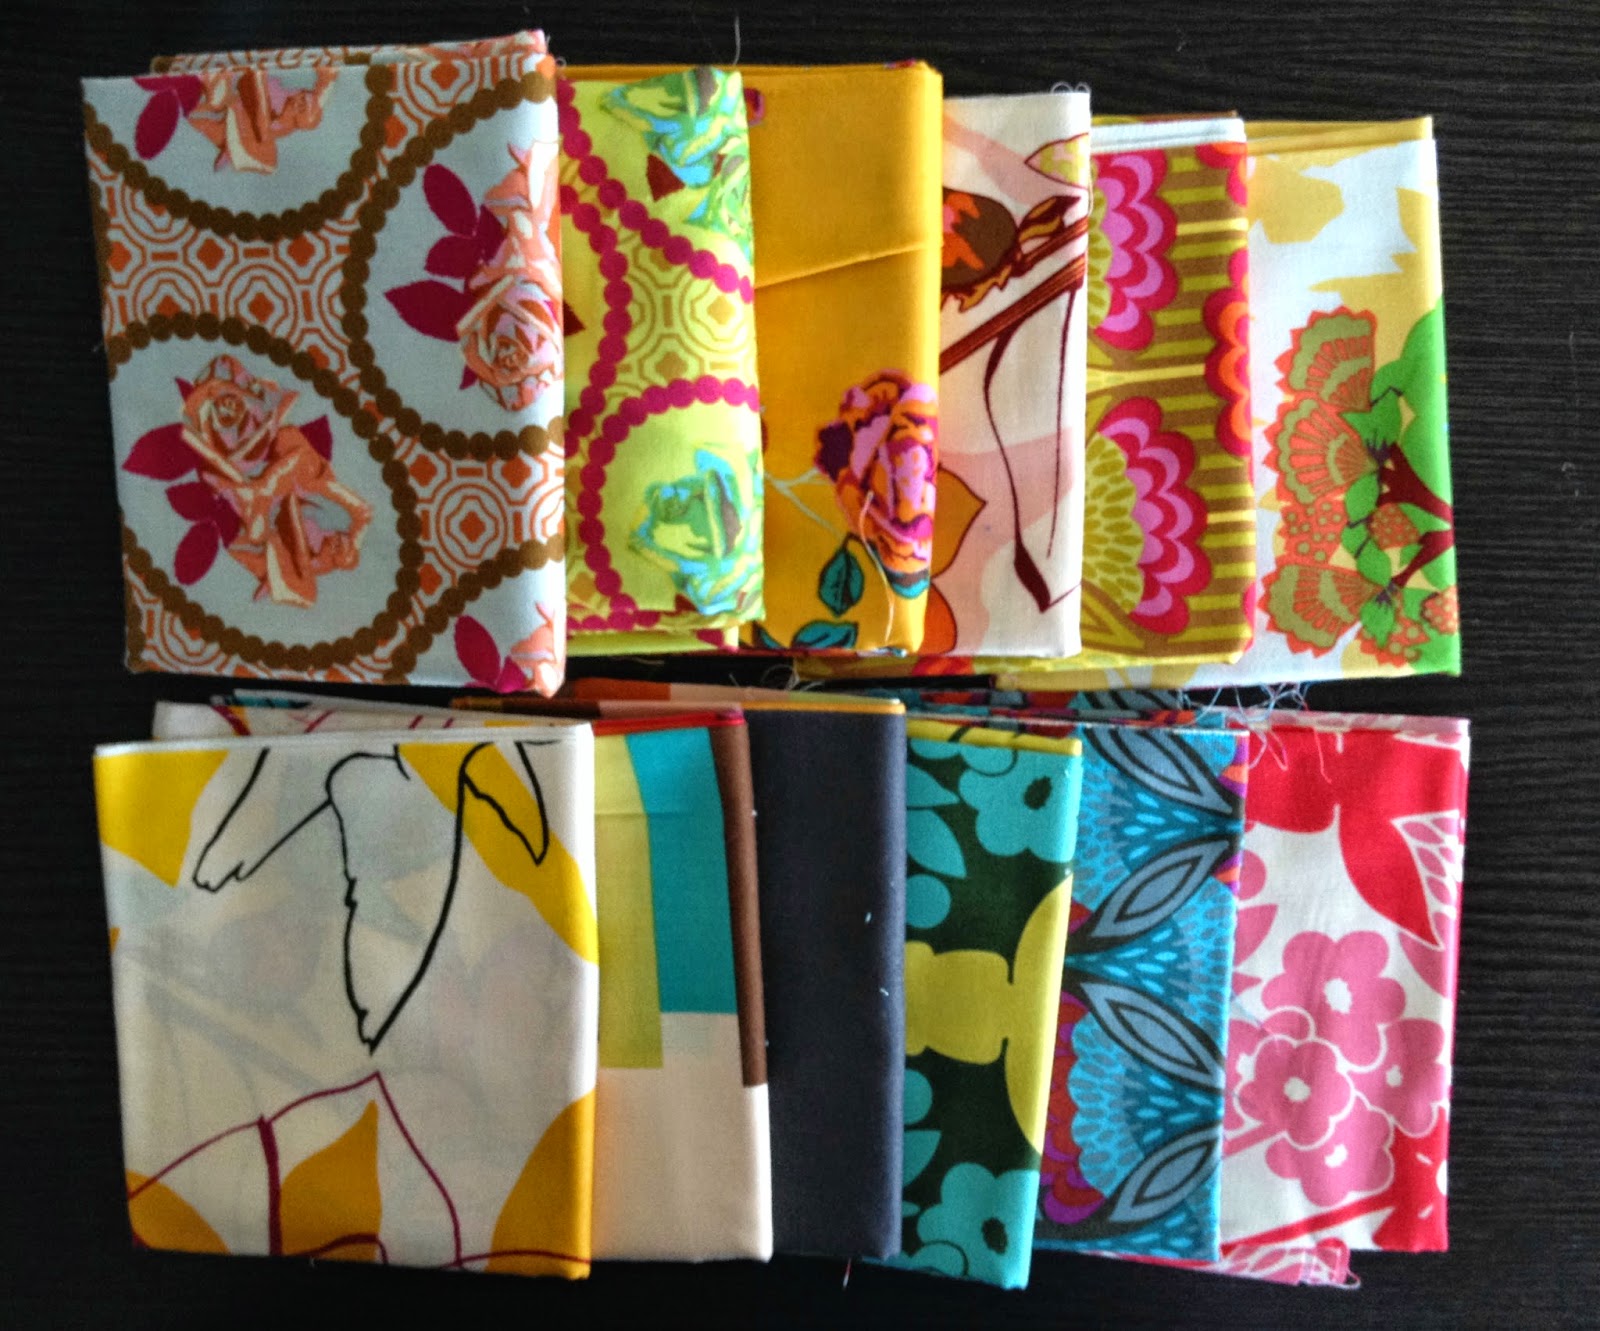 My first thought was to use an AMH selection I'd gotten from winning the #sweatnsew hashtag one month. It's so pretty, but very different from the colors I generally use, and I thought this might be a great place to use it up. But I soon noticed the SCALE of these fabrics was WAY too big for some of these teensy pieces -- you can see it best in the two fabrics in the following picture:

See what I mean? I might be able to get one of the leaves on that giant rose into some of the bigger pieces, but when the size of a graphic in your print is bigger than your finished quilt block, that's a pretty good indicator that this is the wrong print for you to work with. :)
So, next I pulled some warm fabrics from my stash. These are fabrics I bought without any real intent in mind -- they were just so pretty I had to have some! When I am buying fabric just to buy it, I usually buy a fat quarter -- it's just enough fabric to really get a good feel for it, but at $2-$3 apiece, they don't break my budget to get one here and there.

I thought these colors were pretty, but they were kind of missing something -- and I decided it was pink they were missing. I tried a couple of pinks, but my favorite (shown below) is just a little 5" square from a charm pack I used for another project.

Doesn't that look so much better? I love that it just bridges that yellow and red a little. In real life, it's a little more coral, so it kind of takes the place of orange just a little too. Unfortunately, I didn't find it (or anything even close) at any of the local shops I visited, so I ordered some from an etsy shop in California. It should come sometime next week. :)

Next, I went for some cool colors. I haven't used much black in my quilting, so I thought I'd throw a little of that in there, just to see what happens -- and I absolutely love it! I realize I'm leaving out purple in this selection -- that's because I really don't love purple and only have one fat quarter in my stash that's even close to purple. I will probably put together ONE block that uses purple, just to be fair to the color -- but if I do, I'll use a kind of pinky purply berry color that I do like. A little. I know, I'm totally prejudiced against it.
And now the moment of truth -- do I like them all together?

I LOVE IT!! I've been learning a lot lately about what MY style is -- and I think this describes it perfectly. A lot of flowers, some polka dots, little bit of bright (that green floral!), a little bit of fun (yellow with pink flowers!), and a little bit of drama (black!). You may notice, I did take out the brown polka dot -- I felt like the gray was a little better on its own.
Since I took these pictures, I've gotten a couple more fabrics at my LQS, including (but not limited to) these beauties:
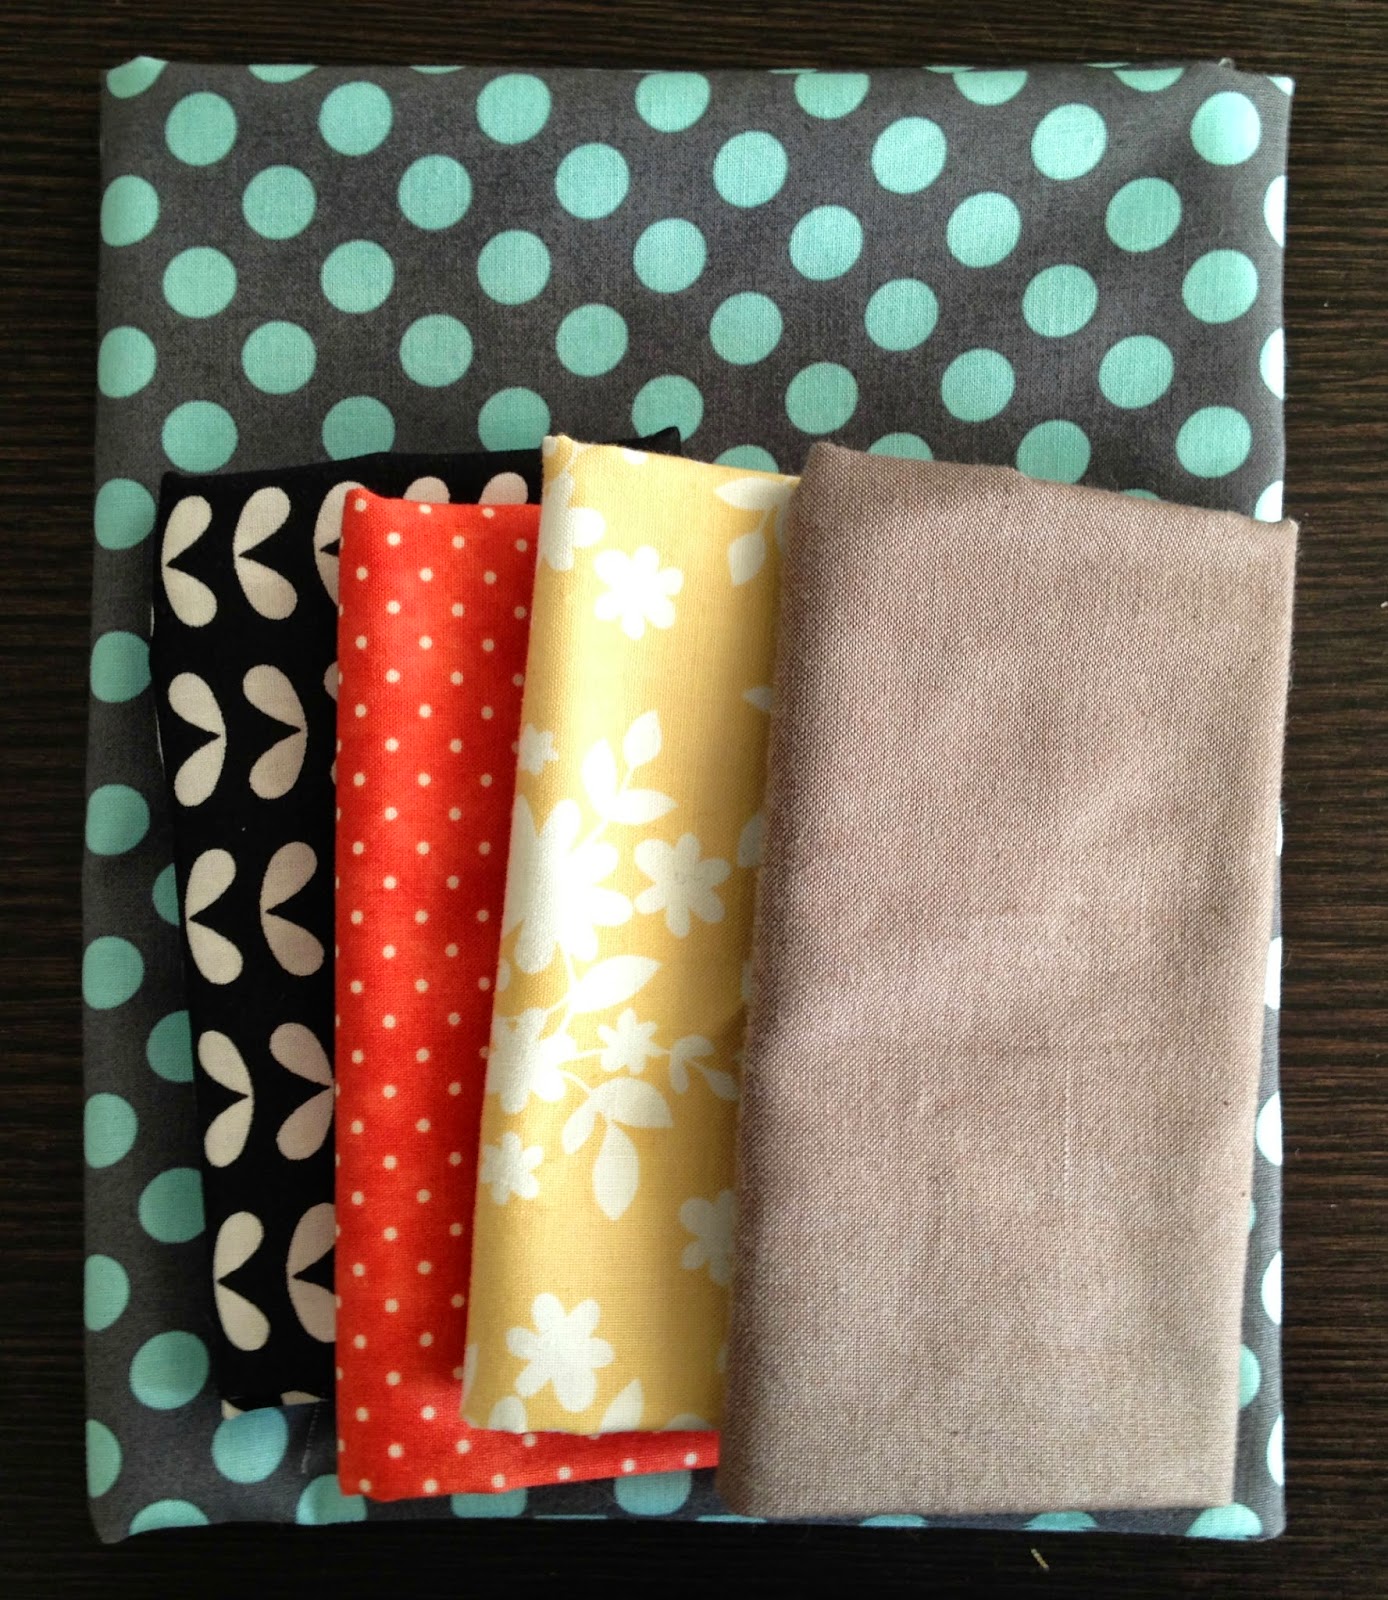
I may or may not use that blue polka dot on gray -- it might be a little too two-toned, since everything else is very much one color -- but I couldn't leave it behind. It would have been lonely for me! :) And I have a couple of baby blankies to make for friends soon, so that will be perfect for something I'm doing, whether it's this or not.
Now that I've got things (mostly) figured out, I can't wait to get started on my blocks!
FABRIC REQUIREMENTS (a.k.a. the MATH)
The fabric requirements really threw me for a loop with this project -- the fabric requirements for the sashing and border are listed on page 5, but basically Marie Henry says there's no way to calculate how much yardage you'll need, because you're doing one block at a time, and because it's such a scrappy quilt. I'm a HUGE planner, so I like to know how much fabric I need right from the get-go. I think the biggest reason for this is that I don't want to buy too much fabric -- I know, there's no such thing! -- because my fabric budget is pretty tiny. I can't be too sad, though -- we're trying to pay off all our debt, and I'm looking at the long-term. I figure by the time we get all our debt (except the mortgage) paid off, my kids will all be in school, and I'll want a bigger fabric budget because I'll have more time to sew! {My mother says that isn't really the way it works, but I'm still holding on to that dream. :)} Anyway, I don't want to buy too little fabric either, because then you either run out and have to use something that doesn't really go, or you have to rearrange things somehow.
I'll talk a little later this week about how I'm going to lay out my quilt and calculate my background fabric, but for this post not to be TOO epic, I'll just talk about the colored fabrics here. They're the most fun anyway! :) I needed an estimate of how much fabric might be needed, so what I did was take all the fabric requirements for the first two blocks, and played around with cutting them out of a fat eighth.* I figured I could easily get two blocks out of a fat eighth, and four blocks out of a fat quarter.
*a fat eighth is a cut of fabric that is about 9"X21", give or take an inch;
a fat quarter is a cut of fabric that is about 18"X21"
So, the math is like this:
FAT EIGHTH REQUIREMENT = # of blocks you'll sew DIVIDED BY TWO
FAT QUARTER REQUIREMENT = # of blocks you'll sew DIVIDED BY FOUR
So, if you're doing all 72 blocks, you would need 36 fat eighths or 18 fat quarters.
{Please note, this is a GENEROUS estimate for the quilt blocks and cornerstones -- you could probably get away with a few less pieces of fabric, but I really hate running out. And love having a lot of variation in my scrappy quilt.}
And if you're pulling fabrics from your scrap bin for this project, I'm with Marie on this one -- I probably won't ever be able to guess how much fabric you'll use!
FABRIC SELECTION
Let's be honest -- this part is so much fun!! And that's what I found when I was pulling fabric from my stash. I just couldn't stop!
See what I mean? I might be able to get one of the leaves on that giant rose into some of the bigger pieces, but when the size of a graphic in your print is bigger than your finished quilt block, that's a pretty good indicator that this is the wrong print for you to work with. :)
So, next I pulled some warm fabrics from my stash. These are fabrics I bought without any real intent in mind -- they were just so pretty I had to have some! When I am buying fabric just to buy it, I usually buy a fat quarter -- it's just enough fabric to really get a good feel for it, but at $2-$3 apiece, they don't break my budget to get one here and there.
I thought these colors were pretty, but they were kind of missing something -- and I decided it was pink they were missing. I tried a couple of pinks, but my favorite (shown below) is just a little 5" square from a charm pack I used for another project.
Doesn't that look so much better? I love that it just bridges that yellow and red a little. In real life, it's a little more coral, so it kind of takes the place of orange just a little too. Unfortunately, I didn't find it (or anything even close) at any of the local shops I visited, so I ordered some from an etsy shop in California. It should come sometime next week. :)
Next, I went for some cool colors. I haven't used much black in my quilting, so I thought I'd throw a little of that in there, just to see what happens -- and I absolutely love it! I realize I'm leaving out purple in this selection -- that's because I really don't love purple and only have one fat quarter in my stash that's even close to purple. I will probably put together ONE block that uses purple, just to be fair to the color -- but if I do, I'll use a kind of pinky purply berry color that I do like. A little. I know, I'm totally prejudiced against it.
And now the moment of truth -- do I like them all together?
I LOVE IT!! I've been learning a lot lately about what MY style is -- and I think this describes it perfectly. A lot of flowers, some polka dots, little bit of bright (that green floral!), a little bit of fun (yellow with pink flowers!), and a little bit of drama (black!). You may notice, I did take out the brown polka dot -- I felt like the gray was a little better on its own.
Since I took these pictures, I've gotten a couple more fabrics at my LQS, including (but not limited to) these beauties:
I may or may not use that blue polka dot on gray -- it might be a little too two-toned, since everything else is very much one color -- but I couldn't leave it behind. It would have been lonely for me! :) And I have a couple of baby blankies to make for friends soon, so that will be perfect for something I'm doing, whether it's this or not.
Now that I've got things (mostly) figured out, I can't wait to get started on my blocks!
Tuesday, April 29, 2014
Teacher Appreciation Week
This year, I was asked to head up the Teacher Appreciation Week at our school. I had done it once in the past and it was the NIGHTMARIEST NIGHTMARE EVER. I took over last-minute for a girl who wasn't able to do it due to a sudden and complicated pregnancy, and she'd planned the most elaborate, intricate Teacher Appreciation Week ever. When it came down to it, I should have re-planned it, but didn't know how else to do things. My oldest child was in Kindergarten, and I naively thought that since I appreciated teachers, everything would work out without too much hassle. The short story is, it was a ton of work, and I was completely overwhelmed. And pulled my first all-nighter since college.
I know some schools are very low-key with their Teacher Appreciation Week. It's generally the first week of May, and their teachers get a small gift from the room parent. At our school, the PTA generally arranges for a treat every day, door decorations, a gift, and an hour-long luncheon for the teachers on Friday. It really is kind of a big deal!
So, you can see why it was with great trepidation that I approached Teacher Appreciation Week this year. I planned throughout the school-year, but decided I needed to really get things going at least a month and a half before our actual week. Our official theme was "Books" -- but our unofficial theme was "I Like Big Books and I Cannot Lie"!!
The one thing that really made me feel calmer was that about 25 people had signed up to help this year! I had a meeting with all the people that signed up to help -- and only three people (one was my next-door neighbor who's just about my best friend) showed up. I wasn't nervous though -- several others said they could help with other projects, but couldn't attend the meeting. Of the three that came, two took two of the treat days, and the other took my scariest project -- the teacher gift. I absolutely hate asking people for donations -- I blame my paper route, where I had to collect money from the people I delivered to. But one of the ladies that came actually volunteered to put the gift together and ask for all the donations -- and suddenly it was like I could breathe again!
As Teacher Appreciation Week drew closer, I put together a few little decorations -- some that didn't work out so well. One that did work out was kind of fabulous -- my neighbor (the same one from before) came over one morning and our kids played while we burned ourselves on the hot glue gun, making a book wreath. It turned out so pretty! The other that turned out was my book page garland. I made hundreds of circles out of book pages, glued them around a long piece of yarn, and wound them around the skein of yarn, just in case I needed more. I ended up using a little less than half of what I made -- but I think it turned out pretty cute, and it was very on-theme. :)
(You can see a picture of both projects on the food table below.)
On Monday morning, the girl in charge of gifts brought them and handed them out, and I gave them a little agenda. I also had the school secretary send out an email telling them that these were the themes for each day, and treats would be in the faculty room from 10:00 - 1:00 every day (except Friday). I think it turned out pretty cute, if I do say so myself! And I have a little nod to the rescheduling in the due dates. Hee hee -- I'm such a nerd about stuff like that!

With our themes, we made sure that each day would have some food treat that coordinated with a children's book. For example, we did blueberry muffins with "Blueberries for Sal", cookies with "If You Give a Mouse a Cookie", etc.
I coordinated with the girl in charge of Room Moms for the door decorating, and in the end all but one door was decorated. We decorated the doors the last day of school on the week before Teacher Appreciation Week. I'm also a Room Mom for my little girl's class, so I decorated that one and the extra one. It's official -- I am possibly the world's worst door decorator. I've done it several times, and I've made peace with the fact that mine are super obviously the worst ever.
 See what I mean? There are so many levels of bad in this picture. I think the teacher knew it was the thought that counts. :) She really is one of the sweetest, kindest teachers we've ever had -- sadly, this door does not reflect that. Oh, well -- I guess we can't all be good at everything!
Friday was my biggest job -- the one-hour luncheon. Even though it was Teacher Appreciation Week, traditionally everyone in the school (from janitors to office staff to teachers) is included in the luncheon. So, I was in charge of feeding 75 people. Did I mention that I feel like I'm really bad at planning parties?!? I had a recipe for a really yummy sandwich (my Dad actually said it was his favorite sandwich ever), and as the day got closer I really wanted to have the meal catered somehow. Of course, I only had $200 to work with, so ordering 6" subs for everyone was out of the question, but I thought I might as well put on my big girl panties and go ask if we could get a discount. I went to a local sub shop and asked if they could give us some sort of a school or group discount, and they said they could give us no tax -- which totally changed the price NOT AT ALL because we already get a tax exemption because it's PTA. Oh, well! So, Thursday night I stayed up a little late making sandwiches. 14 French bread loaves full of sandwiches. And of course there were leftovers (12 would have been more than plenty), so I can say that they were pretty tasty, if I do say so myself! All the other food was brought in by others, so that was probably my biggest role for the day, besides being there and making sure all the food was out.
I think the luncheon was a HUGE hit, and I was so glad I thought of books to coordinate with everything! We had "Pinkalicious" punch (just strawberry lemonade), "Very Hungry Caterpillar" fruit & veggie trays, "Green Eggs..." (deviled eggs dyed green), "...and Ham" sandwiches, and for dessert we did "Alice in Wonderland" treats -- meringues, and cupcakes, and tarts, and all sorts of goodies. The only thing I couldn't figure out a name for was the chips and the pickles, but I figured everything else was so fun it didn't matter. It turned out so cute too!

 This is an example of the thank-you gift I gave to all my helpers.

I know some schools are very low-key with their Teacher Appreciation Week. It's generally the first week of May, and their teachers get a small gift from the room parent. At our school, the PTA generally arranges for a treat every day, door decorations, a gift, and an hour-long luncheon for the teachers on Friday. It really is kind of a big deal!
So, you can see why it was with great trepidation that I approached Teacher Appreciation Week this year. I planned throughout the school-year, but decided I needed to really get things going at least a month and a half before our actual week. Our official theme was "Books" -- but our unofficial theme was "I Like Big Books and I Cannot Lie"!!
The one thing that really made me feel calmer was that about 25 people had signed up to help this year! I had a meeting with all the people that signed up to help -- and only three people (one was my next-door neighbor who's just about my best friend) showed up. I wasn't nervous though -- several others said they could help with other projects, but couldn't attend the meeting. Of the three that came, two took two of the treat days, and the other took my scariest project -- the teacher gift. I absolutely hate asking people for donations -- I blame my paper route, where I had to collect money from the people I delivered to. But one of the ladies that came actually volunteered to put the gift together and ask for all the donations -- and suddenly it was like I could breathe again!
As Teacher Appreciation Week drew closer, I put together a few little decorations -- some that didn't work out so well. One that did work out was kind of fabulous -- my neighbor (the same one from before) came over one morning and our kids played while we burned ourselves on the hot glue gun, making a book wreath. It turned out so pretty! The other that turned out was my book page garland. I made hundreds of circles out of book pages, glued them around a long piece of yarn, and wound them around the skein of yarn, just in case I needed more. I ended up using a little less than half of what I made -- but I think it turned out pretty cute, and it was very on-theme. :)
(You can see a picture of both projects on the food table below.)
On Monday morning, the girl in charge of gifts brought them and handed them out, and I gave them a little agenda. I also had the school secretary send out an email telling them that these were the themes for each day, and treats would be in the faculty room from 10:00 - 1:00 every day (except Friday). I think it turned out pretty cute, if I do say so myself! And I have a little nod to the rescheduling in the due dates. Hee hee -- I'm such a nerd about stuff like that!
With our themes, we made sure that each day would have some food treat that coordinated with a children's book. For example, we did blueberry muffins with "Blueberries for Sal", cookies with "If You Give a Mouse a Cookie", etc.
I coordinated with the girl in charge of Room Moms for the door decorating, and in the end all but one door was decorated. We decorated the doors the last day of school on the week before Teacher Appreciation Week. I'm also a Room Mom for my little girl's class, so I decorated that one and the extra one. It's official -- I am possibly the world's worst door decorator. I've done it several times, and I've made peace with the fact that mine are super obviously the worst ever.
Friday was my biggest job -- the one-hour luncheon. Even though it was Teacher Appreciation Week, traditionally everyone in the school (from janitors to office staff to teachers) is included in the luncheon. So, I was in charge of feeding 75 people. Did I mention that I feel like I'm really bad at planning parties?!? I had a recipe for a really yummy sandwich (my Dad actually said it was his favorite sandwich ever), and as the day got closer I really wanted to have the meal catered somehow. Of course, I only had $200 to work with, so ordering 6" subs for everyone was out of the question, but I thought I might as well put on my big girl panties and go ask if we could get a discount. I went to a local sub shop and asked if they could give us some sort of a school or group discount, and they said they could give us no tax -- which totally changed the price NOT AT ALL because we already get a tax exemption because it's PTA. Oh, well! So, Thursday night I stayed up a little late making sandwiches. 14 French bread loaves full of sandwiches. And of course there were leftovers (12 would have been more than plenty), so I can say that they were pretty tasty, if I do say so myself! All the other food was brought in by others, so that was probably my biggest role for the day, besides being there and making sure all the food was out.
I think the luncheon was a HUGE hit, and I was so glad I thought of books to coordinate with everything! We had "Pinkalicious" punch (just strawberry lemonade), "Very Hungry Caterpillar" fruit & veggie trays, "Green Eggs..." (deviled eggs dyed green), "...and Ham" sandwiches, and for dessert we did "Alice in Wonderland" treats -- meringues, and cupcakes, and tarts, and all sorts of goodies. The only thing I couldn't figure out a name for was the chips and the pickles, but I figured everything else was so fun it didn't matter. It turned out so cute too!

While the teachers had their long luncheon, the Room Moms made sure there was at least one parent for each class. I made a cute little booklet packet for each class, and they were told to pick up a packet and a ribbon, and the instructions told them how to make it. Basically, each packet had at least one paper per child (plus a few extras, just in case), with writing prompts such as "I love being in Ms. Jensen's class because..." The children could fill it out however they wanted (writing, pictures, whatever), and then the helper bound the booklet with ribbon and they left it for the teacher. I told the parents that when they were done, hangman or some other game might be a good idea. Joel did most of the hole punching while I was making the sandwiches Thursday night -- I decided he could appreciate the teachers too! :)


If you look closely, you'll say this one says: Joel -- You're a champ and my FAVORITE! Love, Natalie :) THANKS Your help was better than chocolate. Inside a snack-sized baggie was an assortment of snack-size Kit Kats and miniature Reese's Peanut Butter Cups. (Joel got extras because he got this baggie and helped me eat the leftovers too -- but he earned it!)
In retrospect, I think I should have actually done a little more coordinating with other helpers -- I ended up helping with three days out of the four, plus my biggest job was the luncheon. I guess I'll know better for next year, right? Oh, wait -- didn't I mention? I'm in charge next year too. The good news is, I've got a little experience under my belt, so I feel like next year could be the year of stress-free Teacher Appreciation Week. The extra-good news is, I found out that door decorating is -- get this -- OPTIONAL. Yep, that's something we will definitely not worry about next year! Although I think that might mean we need to do something a little more major at the entrances of the school or something. The extra-extra-good news is, the girl who did the gifts this year VOLUNTEERED to do the same thing next year -- hurray!! It might work out all right after all. :)
Monday, April 28, 2014
5 Ways to Get Your Mojo Back
So, I have been gone for a while. First, it was Teacher Appreciation Week (our school did it March 24th-28th and I was in charge of the whole shebang). Then I got pneumonia - again. But now I'm back with a vengeance! I'll do a quick recap of Teacher Appreciation Week tomorrow and talk about quilting on Friday -- unless I get sick again!
My last post, I'm so sorry to say, talked about how I was avoiding doing any sewing -- and it stayed up for more than a month. How embarrassing! I found my mojo within a week of writing that post, and I'm sad I haven't been able to share until now. Here's how:
1. I gave myself a break.

After writing that post, I realized I really needed to stop feeling guilty about not wanting to sew. I had so much going on, I really felt stressed – and I am NOT a huge fan of organizing parties, so Teacher Appreciation Week was really stressing me out! I told myself that I didn’t have to do anything until after that week of craziness was over – and I didn’t! It was amazing how much more motivated I felt after that week was over, too. I wanted to sew again! But before the week was over, I participated in a Rainbow Flashmob on Instagram. I was accidentally assigned two different colors - blue and orange - so I did both. It was so fun!
2. I organized some areas in my sewing room.

3. I started eating right & exercising.


I know this doesn’t necessarily correlate with quilting, but I really noticed a difference in my motivation when I started eating really healthy and exercising. My sister’s sister-in-law had a health challenge, and it REALLY was a challenge! We got a point or two for everything we did perfectly each day, and the points were for things like eating no sugary treats, no fried foods, and 5 fruits & veggies each day. To get a perfect score you had to exercise FOUR HOURS a week! It was so hard for me – but I was killing it until I got pneumonia! Now I’m back to my sedentary ways (I’m still in recovery and don’t want to do too much too soon), but tomorrow I’m going running with a friend and have high hopes of being healthy again.
4. I made a design wall.

I used ideas from a couple of different tutorials (from Oh, Fransson! and Ellison Lane, mostly), but basically I got some foam insulation and taped batting around it. I just used tape because I don’t have a staple gun – we are very basic on the tools around here – and I thought it would work out okay. It looks so good, I think! There was a cute little photobomber in this picture – I asked him to look tough with his “sword” and this is what I got!

5. I have a deadline.

There’s nothing like a deadline to really make you go go GO! I am going to International Quilt Market in May, and my goal of four new patterns just can’t happen – since I lost a week and a half to pneumonia, I really can’t do one more thing. But I do think I can get three new patterns done. I really need to focus and work hard, but now that things are tidy and I’ve got my mojo back, I really think I can do it! I'll have an update on Friday -- we'll see how I do!
Tuesday, March 11, 2014
Swatch Board
So, I've always been pretty anal particular about color placement in my quilts. The thought of putting all my scraps in a paper bag and just taking fabric out piece by piece literally makes me feel super jittery.
About a year and a half ago, I got a smart phone. It was great because my camera had just died, and it was so much faster to turn on than my camera had been! (It was pretty great for other reasons too... email, music, instagram, plants vs. zombies...) So, when I was laying out my quilts, I'd just snap a picture and keep referring to it whenever I needed to. Such a great idea! And sometimes it still works, but if I take another bunch of pictures of my kids, then it gets a little lost.

If I'm working on a really scrappy quilt, that's still pretty much the only way for me to go. But... sometimes I don't want toget distracted by instagram go searching for that picture. I have a really messy bulletin board in my sewing room, and it's the perfect place for me to put a little swatch of what I'm going to put on my quilt. I've done it a couple of times before, but I've always had a hard time getting the fabric to stick to the paper. I've tried tape, and staples, and nothing was really great.
But then last night I had an epiphany -- why not sew it onto the paper? I'm not new to sewing on paper, and I have a special needle to use just for paper, so it was pretty simple to just tack it down. Here's what I did (isn't it cute?!):
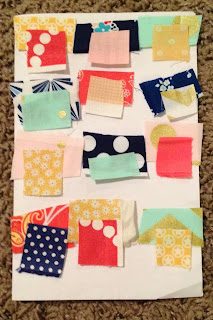
So, I made a little tutorial on how I did it. First, I arranged the fabrics onto the paper. This was just a little project, so I only needed a half-sheet of paper. I really liked the extra stability of the doubled paper, so I'll definitely be using a double sheet in the future, even if it's a bigger project. I arranged these fabrics a few times -- I told you I'mpicky careful! I have an outer and an inner fabric for this project, so I made the outer fabric around 1" x 2", and the inner 1" x 1" so I could keep them straight. Please note the green fabric on the top row in the middle -- I totally used selvedges whenever I can, so I'm only taking away about 1/2" of usable fabric.

Then, I took off the top layer. I VERY carefully set it all in order to the side, and then used a glue stick to glue down the fabric in place.

Now, that glue is TOTALLY not going to hold your fabric for very long. So, very very carefully, you take the paper over to the sewing machine and tack it down with some quick stitching. I like to do it along the top edge of the fabric, just catching that top edge. The rest of the fabric will be a little loose, but that's okay, because gravity will take care of it for you. Hopefully you can see that in this next picture (the top edge is to the left in the picture):

After that's done, set the inner fabrics on top of the others, setting each one a little bit down from the top of the outer fabric. If you need to add a little bit of glue, it's best to just apply it to the paper. Then, sew down these fabrics just along the tops.

And now you're done! Hang it on your bulletin board -- even if it's super messy. :)

There's all sorts of treasures up there -- I can't get rid of a single thing. Do you see the sweet picture my little girl drew me? It's a portrait of me -- in case you couldn't tell. She is definitely a better artist than I am. :)
The best part about this method is that I can look at it all day long, and it keeps me on track so I don't have to worry about misplacing any of the pieces. I almost can't go wrong!
About a year and a half ago, I got a smart phone. It was great because my camera had just died, and it was so much faster to turn on than my camera had been! (It was pretty great for other reasons too... email, music, instagram, plants vs. zombies...) So, when I was laying out my quilts, I'd just snap a picture and keep referring to it whenever I needed to. Such a great idea! And sometimes it still works, but if I take another bunch of pictures of my kids, then it gets a little lost.

If I'm working on a really scrappy quilt, that's still pretty much the only way for me to go. But... sometimes I don't want to
But then last night I had an epiphany -- why not sew it onto the paper? I'm not new to sewing on paper, and I have a special needle to use just for paper, so it was pretty simple to just tack it down. Here's what I did (isn't it cute?!):

So, I made a little tutorial on how I did it. First, I arranged the fabrics onto the paper. This was just a little project, so I only needed a half-sheet of paper. I really liked the extra stability of the doubled paper, so I'll definitely be using a double sheet in the future, even if it's a bigger project. I arranged these fabrics a few times -- I told you I'm

Then, I took off the top layer. I VERY carefully set it all in order to the side, and then used a glue stick to glue down the fabric in place.

Now, that glue is TOTALLY not going to hold your fabric for very long. So, very very carefully, you take the paper over to the sewing machine and tack it down with some quick stitching. I like to do it along the top edge of the fabric, just catching that top edge. The rest of the fabric will be a little loose, but that's okay, because gravity will take care of it for you. Hopefully you can see that in this next picture (the top edge is to the left in the picture):
After that's done, set the inner fabrics on top of the others, setting each one a little bit down from the top of the outer fabric. If you need to add a little bit of glue, it's best to just apply it to the paper. Then, sew down these fabrics just along the tops.

And now you're done! Hang it on your bulletin board -- even if it's super messy. :)

There's all sorts of treasures up there -- I can't get rid of a single thing. Do you see the sweet picture my little girl drew me? It's a portrait of me -- in case you couldn't tell. She is definitely a better artist than I am. :)
The best part about this method is that I can look at it all day long, and it keeps me on track so I don't have to worry about misplacing any of the pieces. I almost can't go wrong!
Subscribe to:
Posts (Atom)