

Originally, I wanted to make this cute reindeer for the main part of a stocking, but with 1/2" finished pieces, it was still 8" x 8 1/2" finished, and I thought that was a little bit big for a stocking. Who wants to fill a stocking that big? :) So, instead, I think I'll make a cute little wall hanging à la Lori Holt, but I'm finishing up enough projects right now, I'm sure I'll have to do it another time. Possibly next year? We'll see...
FABRIC REQUIREMENTS: I just used scraps for my little reindeer, but I'm sure you could a couple or three reindeer out of 1/8 yd. (or fat eighth) of background fabric and 1/8 yd. (or one fat eighth) of red fabric. I prefer the body of the reindeer to be all one color, but you could make him in a different color (green or brown or anything), or make his horns brown and his feet black, or even make him really scrappy – I think he'll be cute however you make him!
CUTTING INSTRUCTIONS: Just cut one of each piece, unless otherwise specified.
RED:
1” square – cut three
1” x 1 ½” – cut two
1 ½” x 2 ½”
1” square – cut two
1” x 1 ½” – cut three
1” x 2 ½”
1” x 2” – cut two
2” x 4 ½”
WHITE:
1” square – cut four
1” x 1 ½”
1” x 2” – cut four
1 ½” x 2” – cut two
1 ½” x 2 ½” – cut two
2” square – cut two
2” x 3”
2” x 3 ½”
2” x 4”
ASSEMBLY: I made this one section at a time, and put it together log-cabin style, attaching each section clockwise around the center section as I went along. That's how I wrote these instructions, but you could also assemble the sections individually and sew them all together at the end. The section assembly will be preceded by an asterisk, so you can leave those instructions for the end if you'd rather.
SECTION 1:
RED:
1” x 2”
1 ½” x 2 ½”
2” x 4 ½”
WHITE:
1” x 2”
2” x 3 ½”
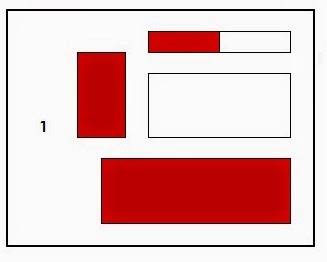
1. Sew red 1” x 2” to white 1” x 2” , along the short side.
2. Sew white 2” x 3 ½” to bottom of unit; orient so the red section is in the top left corner.
3. Sew red 1 ½” x 2 ½” to left of unit.
4. Sew red 2” x 4 ½” to bottom of unit.
RED:
1” x 1 ½”
WHITE:
1” x 1 ½”
1 ½” x 2 ½”
2” square

2. Sew white 1 ½” x 2 ½” to right of unit; orient so the red section is in the top left corner.
3. Sew white 2” square to top of unit.
* Sew SECTION 2 to the right of SECTION 1.
SECTION 3:
RED:
1” square
1” x 1 ½”
1” x 2”
WHITE:
1” square
1” x 2”
1 ½” x 2”
2” x 4”

2. Sew red 1” x 2” to top of white 1” square. Sew this unit to right of previous unit; orient so red parts connect.
3. Sew white 1” x 2” to top of red 1” square. Sew this unit to right of previous unit; orient so red square is in bottom right corner.
*Sew SECTION 3 to bottom of SECTIONS 1 & 2.
SECTION 4:
RED:
(3) 1” square
1 x 1 ½”
1” x 2 ½”
WHITE:
(2) 1” square
1” x 2”
1 ½” x 2 ½”

2. Sew white 1 ½” x 2 ½” to bottom of unit.
3. Sew red 1” square to top of white 1” x 2”. Sew red 1” x 2 ½” to left of THIS unit. Sew this unit to bottom of previous unit.
4. Sew white 1” square to left of red 1” square. Sew to bottom of unit.
*Sew SECTION 4 to left of SECTIONS 1-3.
SECTION 5:
RED:
1” square
(2) 1” x 1 ½”
WHITE:
1” square
1” x 2”
1 ½” x 2”
2” square
2” x 3”

2. Sew red 1” square to left of white 1” x 2”; this is the top of this unit. Sew white 1 ½” x 2” to left of red 1” x 1 ½”; this is the bottom of this unit. Sew top of this unit to bottom of this unit, so red square is in top left corner and red rectangle is in bottom right corner. Sew this unit to right of previous unit.
3. Sew white 2” x 3” to right of previous unit.
*Sew SECTION 5 to top of SECTIONS 1-4.
You're done!! Don't worry if he looks a little funny at this point -- adding a 1/4" seam allowance to a 1/2" square makes things look way out of proportion, but when you put him in a quilt he'll look all right. :)
And, just for fun, I thought I'd change things up just a little bit, and give old Rudolph a scarf.

SECTION 1:
RED:
(2) 1” x 2”
1 ½” x 2”
2” x 3 ½”
GREEN:
1” x 2”
1” x 3”
WHITE:
1 ½” x 2”
2” x 2 ½”

2. Sew green 1” x 3” to bottom of unit.
3. Sew white 2” x 2 ½” to right of unit.
4. Sew red 1” x 2” to left of green 1” x 2”. Sew red 2” x 3 ½” to right of THIS unit. Sew this unit to bottom of previous unit.
Proceed with all other instructions as described previously.
I hope you like this project -- and if you make a little reindeer, please let me know!
MERRY CHRISTMAS!


