Monday, November 9, 2015

Onesie Lace

I have two baby showers -- for three babies -- this week, and thought I'd try something new and crafty.  It might just be my FAVORITE new go-to gift for baby showers!
 
I had the idea to do a little lace ribbon on the top of a onesie, but I wasn't quite sure how to finish off the ends so they wouldn't fray. Since I don't know how to make my own lace, I didn't really think of that until I saw this link on Pinterest -- and then the wheels started turning! Even though it says "tutorial" it was really just pictures of this cute little ribbon flower. Well, since I can generally figure things out, I decided to give it a try -- and after a little trial & error, about an hour later I had the perfect pattern for this cute little lacy ribbon that I could sew right onto a onesie.
 
Since I didn't come up with this idea myself, and since it said "tutorial" right on the page, I thought I'd help everyone out (and help myself remember too!) by posting my instructions for this cute little onesie lace.


ONESIE LACE
 
Use 10-wt. crochet thread and a size 7 (1.5 mm) hook
SING= single crochet (wrap 0 times before pulling a loop through)
DBL= double crochet (wrap 1 time before pulling a loop through)
TREB= treble crochet (wrap 2 times before pulling a loop through)
 
Foundation row: 0-3 mo. ch. 44 (3-6 mo. ch 48); turn.

Row 1: TREB in 7th ch from hook. *TREB 3 away from last TREB, ch 3, TREB in same hole* around.

Row 2: *TREB 2X in ch3 from prev row, ch 3, TREB 2X in same opening* to beginning.
            (first treb = ch3)

Row 3: *DBL-TREB 4X-DBL in ch3 from prev row, SING in small opening* to beginning,
(first DBL = ch2; end on DBL-TREB 4X-DBL)

Finish off and weave in ends. Sew onto onesie, hiding ends under flaps, using 50-wt. Aurifil thread (I matched my thread to the onesie color -- just plain white).


Tuesday, October 13, 2015

Happily Ever After

I love the creative process so much. I really believe that creativity is a God-like and God-given trait. I think it all started when I was just a little girl, reading stories with my mother. Those stories were the most creative thing -- they told of graceful and virtuous princesses and valiant and brave princes and they inspired me to be a writer someday. I wanted to create something just as wonderful for some other person as those stories were to me.

I don't really remember a time when I couldn't read. I was probably just fascinated with stories and books, and since I was the first child in my family, my mother was able to read to me a lot. I suppose I just figured out that those little squiggly lines on the page meant words! However it happened, though, I have loved stories, especially fairy tales, all my life. Hence the "Natalie Ever After" blog title and the "Sweet Nightingale" etsy shop!

Just before I started this blog, I found this amazing quote.


I have seen it attributed on various websites to both Walt Disney and to "Disney Imagineer", so I'm not sure the quote's author is actually known. (If you find first source documentation, please let me know and I'll correct this post!) I'm not as concerned with who the author is, though, because the words of this quote speak to me so deeply. It is such a beautiful way of expressing WHY fiction is so important -- because, in the end, what binds the whole human race together is the idea of a happy ending -- whether it's for here and now in the love that two human beings can share, or whether it's a heaven that you go to when you die. It really is magical to think that we can be happily ever after

I have never liked the argument that fairy tales give children the notion of a false reality -- that they grow up with unrealistic expectations of the world around them. I grew up reading fairy tales and cowboy stories (Louis L'Amour was a staple) and the sappiest romances (anyone else a fan of Janette Oke?) as fast as I could -- and yet, I saw the world through realistic eyes and didn't expect everything to be perfect once I found my one true love. Life is hard, and I believe it's hard to make us stronger -- but there is still that idea of happily ever after that really is magic!  And isn't that the dream that helps us keep going forward, working towards that goal?

I thought the pacing of this quote made it perfect to format like a poem, so I made these two colorways (one for boys and one for girls) to hang in my childrens' rooms. And then... I forgot about my plan, and discovered them again just tonight. I've since made a gallery wall of inspirational quotes, and I plan on hanging the boy colorway for fall/winter and the girl colorway for spring/summer, because I want my children to love words and books and believe in magic as much as I do. And judging by the way my kids sometimes get in trouble for reading too much in school read voraciously, I think they're well on their way.

If you would like either of these quotes, I have them in regular letter-sized paper (pdf form) here:
 
and here:
 
The creative process is just the same -- it is such MAGIC to create something with your own two hands! My husband is a sci-fi/fantasy writer, and I know he feels that same magic when he is creating a world, or working through a particularly difficult scene. So, whether you believe in the magic of fairy tales, or the magic of the creative process, I hope you enjoy these printables -- and create a little magic of your own!

Thursday, October 1, 2015

{Creepy Creepy Creepy}


Oh, who doesn't just love Halloween? I've decided I like it a little bit creepy, a little bit spooky -- but not truly scary or gory. One of my favorite ever Halloween shows was Buffy the Vampire Slayer, where they accidentally raise a fear demon -- it's such a scary episode, with a huge surprise at the end! Let me just say, Giles is the best -- and if you've seen it, you know what I mean!

And now I'm going to show my nerd a little bit more -- because I loooove Doctor Who, and they have the CREEPIEST poems on that show! I decided to decorate my quote wall with some of the creepiest of the bunch -- The Whisper Men, Zagreus, and an excerpt of the poem "Goblin Market" by Christina Rossetti. I used three different old-fashioned typewriter fonts, all from dafont.com -- my FAVORITE font place! I think I'll probably put some spiderweb and plastic spiders around the frames, just to make it extra spooky! And while I was at it, I also formatted the most widely recognized version of Edgar Allen Poe's "The Raven" -- I'm not sure how I'll display this, as it's four pages long, but I wanted my kids to hear the creepy voice that is EAP!

Since I wanted to do this for myself, I thought maybe others would also like a little Halloween poetry to make their holidays spooooky, so I uploaded them to my google drive. The first two poems are meant for a 4"x6" frame, and Zagreus is for an 8"x10". You can access them using this link:
Halloween Poetry

Happy Haunting!

Tuesday, September 29, 2015

2016 Primary & Youth Cross Stitch

I was recently called to be the Primary Chorister in my ward*. I was super sad to leave Young Women, because I truly had such love in my heart for those good kids! But I love those cute little Primary guys too -- even the naughty boys in back who think they're too cool to sing. They're not too cool when I threaten them with solos! (hee hee hee -- I might be just a little bit ornery about that.)

*in my church, the members are "called to" or "released from" certain positions as needed -- we don't do it for pay, it's all volunteer. We believe that Heavenly Father calls us to these positions through the Bishop, Stake President, or other leaders. The Primary Chorister leads the singing time for Jr. and Sr. Primaries -- meaning the kids from 3-12 that attend our ward. In our ward, we have a BUNCH of little guys, so they are split into two groups and I teach them church songs.

So, I decided to make a new cross stitch for General Conference -- my Young Women torch is almost done! And since I'm in Primary, I thought a simple, fun Primary theme pattern would be good.  I came up with a boy and a girl version, as you can see here:

2016 Primary Theme - Girl

2016 Primary Theme - Boy

But then a funny thing happened last Tuesday -- the Stake Executive Secretary called me to meet with the Stake Presidency. I went in with no expectations at all -- I thought I might be on a panel discussion or something -- and lo and behold, I am now the Stake Camp Director! (This means I'm in charge of all the Young Women at our annual week-long Young Women Camp -- and there are about 400 or so girls in our Stake!) So I've been secretly pinning my heart out with ideas for Girls Camp, and came across some really fun stuff by Amanda at jedicraftgirl, it's so nice to have a resource like that! I made my boards public this morning, since I was sustained Sunday, and now that I'm in Young Women again, I thought I'd modify my original patterns for the youth as well.  They turned out so nice!

2016 Youth Theme - Young Women

2016 Youth Theme - Young Men

Specs
Fabric Requirements: one package of 15" x 18" 14 ct Aida will yield two different themes (just cut in half so you get two 9" x 15" pieces) -- trim as necessary after finishing the piece. I used white Aida for the boy version and oatmeal Aida for the girl version.

Floss: You can follow my color recommendations, or come up with your own!
For the boy version, I just used scraps of thread I had already used in other projects, but stayed pretty true to the colors in the cross stitch pattern.
For the girl version, I will use these six colors:
  • DMC White
  • DMC 745, Yellow - LT PALE
  • DMC 761, Salmon - LT
  • DMC 3712, Salmon - MED
  • DMC 3808, Turquoise - ULT VY DK
  • DMC 3825, Pumpkin - PALE
I didn't include beginner instructions for this pattern, since I've already put out something similar with the Young Women torch and Provo Temple cross stitches. If you need anything more than what I've included here, please let me know -- but I think any information you need will be either in this post or in those beginning instructions.

And once again, here are the links for each pattern:
2016 Primary Theme - Girl
2016 Primary Theme - Boy
2016 Youth Theme - Young Women
2016 Youth Theme - Young Men

I have to admit, I've already started on my own cross stitches -- I just couldn't wait for Conference to start! I really wanted to get one completely done so I could show it, and I just finished last night.  Here it is, in a 5" x 7" frame:

Please let me know if you complete any of these patterns. Just email me at smileynann@yahoo.com -- I'd love to see them!

Wednesday, September 23, 2015

Radio Silence

Hey everyone!
I'm sorry to say, this radio silence has gone on for much longer than I anticipated. I have so many blog post ideas, but just not quite enough time to follow through on them all. I decided early on in this blog that I didn't want to post JUST to post, but that I would make sure I have important content in each blog post. In addition, I am the Mama to a passel of kids that need my motherly attention, and for me that has to come first. As a result, sometimes I don't post for a while. I hope you'll forgive me. I have a few really fun ideas in the works -- and one super fun tutorial I'm hoping to publish this week in anticipation of General Conference -- so please be patient with me and my human-ness. See you in a few!
Natalie :)

Monday, July 13, 2015

#BFTPqal - Finished Top


I finished my Blocks from the Past quilt top! I'm pretty proud of myself -- I really wanted to do a big, fat sampler quilt (a la Camille Roskelley's Farmer's Wife quilt), but I've come to peace with a "time and a season" mentality, and it's just not the time or season for this project. I'm so glad I've done as much as I have, though, because someday it will be my time & season, and when it comes I'll remember all my mistakes! :)

If I had it all to do over again, I'd definitely make this quilt differently than prescribed in the book -- almost every block that I made with Marie Henry's instructions had major problems. A few were too big, so I had to chop off my points, and one was almost 1/2" too small -- and I was REALLY careful with that one! For the most part, I'd probably paper-piece most of these blocks. If you do that, you end up with a perfectly sized block, with minimal mistakes.

One thing I'm super pleased with, however, is how I went out of my comfort zone color-wise. I used a whole lot of colors I wouldn't normally use together, and BLACK -- I've only made one other quilt with black, and it was a black-and-white quilt! There are a couple of blocks I'd change if I hated them more, but all things considered, I love it!

(Isn't this a lovely artsy shot? I've been playing around with my camera a bit, and it's really fun to try new compositions! For example, in this shot you can't tell that my sewing room is a COMPLETE DISASTER...)
 
One little trick I have is to make the binding after I'm finished with a quilt, especially if I'm doing a scrappy binding. If I make a regular binding, I don't mind making the it before I start the quilt, but with a scrappy one I'm always nervous I won't have enough fabric for my quilt top if I make the binding first. BUT... if I don't make the binding right after I've made the quilt, then I have to keep all that lovely fabric separate from my regular fabric stash, and I can't use it for anything else! So, I measure the sides of the quilt, add 15-20", and make enough binding to cover the quilt, give or take a couple of inches. Then I can stuff it into my fabric bins neatly put away my fabric, and I'm all ready for another project!

Monday, July 6, 2015

#BFTPqal -- Layout and Setting

This week it’s my turn to talk to you all about my layout and setting squares for my #BFTPqal quilt – I can’t believe we’re already at this point! Remember when I told you all I was doing a different layout than in the book? Well, just like always, my plans changed a couple of times since then, and I decided instead to use the blocks I’d made to make a really great baby quilt/wall hanging – which I may or may not give away, it’s so cute!

The first thing I did to lay out this quilt was to put everything up on my design wall, and arrange the blocks the way it looks most pleasing to me.
 
Next, I decided to use a white sashing, so I cut as many as I needed, exactly as it said in the book. I played around with the idea of using the prints for sashing and having plain white squares, but now that I’ve laid it all out, I’m super pleased with how it’s going!
Before I cut them all out, I arranged the prints on my design wall, with the blocks in the middle.

Once I found an arrangement I liked, I took a picture so I wouldn’t forget my order (have I ever mentioned that I’m a little OCD when I’m laying out everything? I guess I’ve made plenty of mistakes and want to get those out in the planning phase).
 
I decided to make my setting triangles a little bit bigger than in the book, just for insurance, so I cut out my corner triangles with 6 ¾” sides (cut on the diagonal).
For the side setting triangles, I cut my fabric roughly 5 ½” x 11”, then arranged them on my cutting mat so the outer side was along a 1” mark on my mat. I’ll be honest, I wasn’t too picky about which side was “up”, but if you’re wanting to be careful about it, then the outer side of the setting triangle should be at the top of your cutting area. Also, please disregard the bottom fabrics – I wanted to lose as little as possible to waste, so I used some funky-shaped pieces, and they’re a little special. :) I lined up the left edge so the top corner was on or close to a place on the mat where the 45-degree angle is intersecting a 1” mark, then cut on that 45-degree line.

Then I measured over 11” along the top line, and made sure the other edge of my ruler was 5 ½” away from the top edge of the fabric.

That makes a perfectly square, bias-in-the-right-place, cute corner setting triangle, a little bit bigger than it needs to be so I have a little playing room when it comes time for quilting.
And here’s the finished layout:

I can’t wait to get this pretty little quilt top done! But I have a couple of other deadlines that need to be met first, so I’ll be showing off the top next week, when Marion rounds up the last little bit of this fun project. I can’t wait to see how everyone’s quilts have turned out!


Monday, June 29, 2015

#BFTPqal with Katie

Oh my goodness -- this is the LAST WEEK of tutorials! I can hardly believe we're at this point, doesn't it seem like we just started? For this week's tutorials, go to Katie's blog HERE.

Monday, June 22, 2015

#BFTPqal with Marion

This week is back at Marion's blog -- and do you feel like we're getting close? Last week will be the last week of tutorials, and then we're on to construction tips. It's going to be EPIC!

Thursday, June 18, 2015

#BFTPqal with Tiffany

This week will be my friend Tiffany at Always Sewin' Somethin'. She's so adorable -- and BRAVE. She has 2-year-old twins, and just had another baby! Oh, I'm tired just thinking about it -- but hopefully things will be a little easier this time with just one little bundle of joy. :)

Thursday, June 11, 2015

#BFTPqal - my extra blocks

I laid out my #BFTPqal quilt on Monday to see how things were coming, and something was just a little off. I originally planned to make a lap-size quilt, but life got busy and I'd only done my required blocks. Three blocks a week is actually really hard to accomplish, especially if you're making 39 apple blocks and a t-shirt quilt and various bags for Teacher Appreciation (which reminds me, I need to blog about the quilt and those bags -- they're so super cute!).

I decided to try laying out the quilt as per Marie Henry's sashing instructions, and this cute little quilt really came to life -- I tried to fight the on-point layout, but in the end, it really worked for what I want to do!

Anyway, so I only had 15 blocks, which isn't enough for much of anything. Luckily, I have a sister-in-law who's about to have a little girl, and the color palette I chose is perfect for a cute little someone! But to complete my layout, I needed three more blocks -- two applique, and one pieced. Here are the blocks I chose:

Page 17 -- Clay's Choice
I really wanted to do this one, because Clay is my Dad's name. Marie Henry has you do half-square triangles, but I really wanted to use a graphic print for the main part, so I just cut four 2" x 3 1/2" rectangles and did stitch-and-flip corner squares in the background print. It was such a fast finish, I love it!

Page 67 - Laurel Spray
This was one of the block I avoided originally, because it's meant to be on point. I think it's really pretty, though, and since I changed my layout it will fit in nicely.

Page 68 - Lyre 
This block was definitely one I didn't want to do originally -- but Baby Girl's mom is super musical, so I thought a nod to her love of music would be nice. The polka dots are Aunt Natalie's contribution. :)

And here's my final layout -- I think it turned out so pretty!
It's definitely even prettier in real life -- up close, and personal. My favorite blocks are probably the applique ones -- I love the top left so so much, and the floral wreath block just under the lyre, and my absolute favorite is probably the one with three flowers on the right-hand side. I might play around a bit more with the layout, and I haven't completely decided what the cornerstones will be (although I've almost decided to make it scrappy), and the setting triangles -- should I keep them "background" colored? or, once again, scrappy? The choices are endless -- but with a niece scheduled to come in the next couple of weeks, I'll be hurrying to make some final decisions! :)

Monday, June 8, 2015

#BFTPqal - pages 53, 83, & 91

Whew! I made it today -- I wasn't sure I would, I caught a bad cold from my husband and felt kind of bad all day. But I prevailed, and here are my blocks!

Page 53 - Road to Fortune
For this block, I followed Marie Henry's instructions, mostly. I did all the cutting like she said, but instead of the way she said to construct the double hourglasses, I just made double hourglasses and put them together four-patch-style.

Page 83 - Cucumber
I made this block pretty quickly, due to my Heat-n-Bond Lite method of applique. I should have consulted the diagram a little better, though -- I'm a little sad I didn't place my yellow leaves properly; they're not supposed to overlap the cucumbers. The one downfall with fusible applique is that you can't reposition it if you make a mistake!

Page 93 - Storm at Sea
I've been excited to make this block, and for this one I knew I'd need to do paper piecing. I tried the method from Cristy Fincher's Craftsy class, Pain-Free Foundation Piecing, and while I'm relatively pleased with the results of paperless paper piecing, I don't love it for this particular block. It's just a little too little and fiddly -- but I absolutely loved the method, and my favorite part was NOT tearing off a million bazillion teensy pieces of paper and ripping out my seams!

Stay tuned Thursday -- I was having so much fun, I actually did three extra blocks, and I've got my layout all ready to go! I'll be using Marie Henry's sashing instructions after all, so I'll have some fun with cornerstones and setting triangles. I'm so excited -- it's going to be the cutest little baby quilt!

Monday, June 1, 2015

#BFTPqal with Barbie

Today's #BFTPqal is with my sweet friend Barbie from The Quilting Mill. I just love her! She does the most amazing custom quilting -- I've promised myself that someday I'll give her a special quilt top to finish up for me!

And I'm completely MIA -- because I'm at Girls Camp this week! Joel is holding down the fort, so give him a little extra prayer if you have one. He's not looking forward to flying solo, but I'm confident he'll do great!

Monday, May 25, 2015

#BFTPqal with Stacy

This week, the #BFTPqal is over at Stacy's from Sew Nice to Create. She's a fabulous quilter, and such a sweetheart!

Thursday, May 21, 2015

Teacher Appreciation Gifts

Last week was Teacher Appreciation Week at our school, and I was in charge of coordinating everything (just like last year). Luckily for me, we have a bunch of really great parents at our school, many who were once teachers themselves, who really appreciate everything our teachers do!

I couldn't decide on a theme this year, so I decided to just go with a bunch of themes and tie them all up under a shared phrase. The phrase was "Our Teachers Are...", and here are the way the days played out...

Monday: (individual chips)

Tuesday: (pack of gum)

Wednesday: (cookies)

Thursday: (apple wall hangings)
Okay, I totally get that this phrase isn't grammatically correct -- but I did it for the sake of the pun. :)  To go along with this day, I made 39 apple wall hangings -- a ridiculous amount, but I'll explain in a second. Here's what 35 of them looked like:
They're covering my ENTIRE design wall -- it's 4' x 6'!!
 
Friday was our luncheon, so we went with "OUR TEACHERS ARE THE BEST IN THE WORLD!"  We served Italian sodas, American sandwiches, English chips (okay, I realize these aren't authentic English chips, but we're going with the theme here... :)), Swedish fish, and French pastries, all with similar signs to link everything together. As always, it went off so well -- even though I had the flu and couldn't help out with the luncheon like I usually do.

I also had a couple of PTA ladies prepare little booklets for the teachers' helpers (usually room moms) who take over the class for about 30 minutes, to give the teachers a little longer lunch the day of the luncheon. The booklets were 1/4 sheets of paper, one for each child in the class plus a few extras, that said things like "I love it when Mrs. Wimmer..." and "My favorite thing about Mr. Fox is...", with a 1/4 sheet of cardstock for the front and one for the back, and a ribbon to tie the whole thing together. The idea is that the teachers' helpers will help the kids make this book, and then they present it to the teacher at the end of the luncheon.

------------------------------------------------------------------------------

This year I've been struggling a little with anxiety, so I decided to try and simplify some things in my life. As a result, this is the last year I'll do Teacher Appreciation Week -- at least for a while. Hence the 39 apple wall hangings. :) I really do appreciate teachers, but I've started embracing the fact that party planning is not my favorite thing, and I'll leave it to someone else next year.

Monday, May 18, 2015

#BFTPqal & WIPs

Well... I've been kind of a slacker when it comes to letting you know about the #BFTPqal posts.  When I started this blog, I did it with the intention that I wouldn't post anything without really making the content great. I don't like looking at blogs where the author has all advertising all the time. But things have been SLOOOW around here, what with making a bazillion apple wall hangings (more on that Thursday!) and working on my very first ever t-shirt quilt. As a result, I haven't been posting about the #BFTPqal posts either.  I'm sorry -- I'm scheduling them out as we speak, so you can read all about it from now until the middle of June.

So... to recap, the #BFTPqal posts I've missed are:

Katie at Lady Fortune's Wheel
Marion at My Quilt Diet
Barbie at The Quilting Mill
Konda at Moose on the Porch Quilts

and today's post is at Marion's, but it's from Machelle at Cherry Tree Cottage Quilts.

Whew! I can't believe it's been so long since I've posted about these! I solemnly swear to do better!


And what else have I been working on? I am in charge of a local quilting bee we call QBX (for Quilt Block Exchange), and last month I needed a quick project that got rid of a bunch of scraps. I was inspired by my friend Emily's cute son's quilt, but used the tutorial from Ellison Lane as a jumping-off point.  So far, I've only collected 6 blocks, but here they are:

And I'm part of the Beehive #21, sponsored by Blossom Heart Quilts. I think I might have heard about it from Gnome Angel, though -- she's super cute too, and was a finalist for Sewvivor last year!  I was in charge for the month of March, and asked for the Wanta Fanta block. I'm not sure what that means, but I love the secondary pattern this pretty block makes! I'd gotten all my blocks but one at this point (one poor lady found the envelope completely empty and battered on her front porch one day -- I guess it didn't quite make it to the post office!), and I'm so surprised -- close up, I don't really love this quilt... but just a few feet away, and it's one of my FAVORITES!

So, my plan is to update each #BFTPqal post with a little something I've been working on -- but I've learned the hard way not to promise more than I can do!

Monday, April 20, 2015

#BFTPqal and Teacher Appreciation

This week, instead of doing my #BFTPqal blocks, I'll be finishing up some cute little apples for Teacher Appreciation Week. Here's a little preview -- I'll have more information a little later this week on how I made them and what we did for Teacher Appreciation Week last week.  Apples for DAAAAYYYYYYYSSSSSS....

If you're looking for this week's blocks, Katie has them at Lady Fortune's Wheel.

Monday, April 13, 2015

#BFTPqal - pages 35, 36, & 75

Wahoo -- I'm not a pirate any more! I do have a couple more things to do for this week's Teacher Appreciation Week, but after that I feel like I'll be free at last!

I started with the Indiana Rose block on page 75, and I think it's just so pretty -- don't you? I lined up my little star center first, using the old fold-the-background-fabric-in-half-both-ways-diagonally method, then layered the yellow and coral parts underneath, and ironed it all down one at a time. It went pretty quick, and I absolutely love this color combination!

The next block I did was Broken Dishes, on page 35. This one I did using the half-square triangle method where you put a piece of painter's tape on your machine 1/4" away from your needle (I lined mine up with the 1/4" foot and a ruler on my extension table to make it super straight) and then you feed your squares into the machine, keeping the diagonal points on the painter's tape. I sewed all my squares like this, then flipped them over and did the same thing on the opposite side of the block, so there was a 1/2" space in between the two seams, with the center of the block in the middle.
{If you need a better explanation of this, with video tutorial, please see Camille Roskelley's blog post on the subject.}

 For these blocks, I used ten 2 1/2" square of each color, starched them really good and pressed them with the seams open, then trimmed them each to 1 1/2".

A little trick I used to make all the lines on the brown fabric go up & down, I lined up the blocks as I was sewing with half of the lines going towards the right, and half of them going towards the left. I used two finished squares of each type in each block, so they all came out going straight-ish up!

The last block, Old Maid's Puzzle from page 36, I did waaay different than I've done in the past. I decided I didn't want to paper-piece the little corner pieces, because I didn't want to have to mark my papers so much, and with such teensy pieces. So, instead I made half-square triangles, just like the Broken Dishes block, and starched them like crazy before I pressed them open. I know there are a lot of quilters who abhor open seams, but I really have to do it on these teeny tiny blocks or nothing matches up.

I figured I'd need 7/8" finished pieces for the dark & white sections, so I cut my squares at 2", and then cut them down to 1 3/8". I also cut six 2" white squares for the setting triangles, and cut them in half, and used two 3 1/2" squares of the blue, cut in half.

 
After everything was prepared, I sewed the squares and setting triangles into rows, and cut off the excess from the setting triangle to make a straight line at the bottom of each row.
 
Then I sewed the rows together. 
 
When I was all done, I aligned the square corners in a corner on my cutting mat, and lined up my ruler so there was a 1/4" seam allowance away from the points of my dark triangles.
 
Then I sewed the two triangle parts together, and trimmed the block down to 3 1/8".
 
Finally, I cut four white strips and one coral square. I put everything together, and lucky me -- it turned out pretty close to 6 1/2" square!
 
I sure did enjoy having my blocks turn out just as pretty as I'd planned them -- I guess it's the curse of being the oldest child, but I just LOVE being right! :)

Thursday, April 2, 2015

Argh

Nope, I'm not a pirate -- I'm just doing a mean impersonation of one lately. I've got a few too many balls in the air, and this blog fell down. :( I'm crossing a couple of things off my list next week, though, so hopefully I'll be back on track with #BFTPqal and regularly scheduled posts by then!

Until then, the blog post for last week's #BFTPqal is up at my friend Barbie's blog, The Quilting Mill.

And the blog post for this week's #BFTPqal is up at my friend Tiffany's blog, Sewin' somethin'.

Next week will be Maggie at Shortcookie.

And after that I hope to be back on track!!

Monday, March 16, 2015

#BFTPqal - pages 25, 26, & 69

First up is "Cross and Crown", from page 25. This block went together like a breeze -- but just because I paper-pieced it and adjusted the measurements.  I mean, really, there is just no easy way to get 5 sections into a 6" block.  So, I made up my paper-piecing patterns just like I did about a month ago. Again, I chose to have the center strips 1" finished, which meant each quarter was 2 1/2" finished -- which makes for some pretty easy quilt math, I think. :)

Second is "Cat's Cradle" on page 26. I decided not to do any background on this block, since it's written that way, but I'm not so sure about how I like the color placement after all.
 
And last is our applique block -- "Rose Wreath" from page 69. The bias strips I did just like the "Rose Spray" block I did a couple of months ago, and I used Heat-n-Bond lite for the roses. This was the fastest block of them all! I did a couple of things -- like using glue to baste the bias strips down -- just like it's outlined in the book, but what I did different (other than the Heat-n-Bond), was to do the circles in the center of the flowers UNDERNEATH the petals. I just really like that look better, and since I was fusing the petals anyway, I just fused them on top of the fabric I used for the centers. I did use a little glue underneath the flower centers as well, just to make sure everything will stick until I'm ready to quilt everything down.

Thursday, March 12, 2015

Round Robin

About 2 years ago, I was approached by some friends (I can't remember who exactly started it) to join a Round Robin quilt swap. I've never done one before, but my Mom has, and it's been fun to see some of the things she's done for them -- and to see what she's come home with!  The girls wanted an 18"-ish center, and there just aren't a whole lot of patterns out there written for 18", so I decided to try out a brand-new, never-before-seen, Natalie original pattern, which looked a little something like this:

The only problem was, I REALLY had a hard time letting go of this. Because I'd never really put myself into others' care, I really had a hard time trusting them to take care of my baby.  Would they completely lose the center?  What if they hated my block?  What if they took it in a completely different direction -- and it came back to me and I hated it?

We had a rule that nobody could see their quilts during the swapping process, so it would be a total surprise at the end, so I stewed about things for a little while.  And then, finally, I just had to let myself be okay with releasing my baby into the big, bad old world, and letting it grow up.

We had a phenominal group of quilters working on the swap, and I feel everyone really tried hard to give it their all. Sometimes a simple stop border was all the quilt needed -- and sometimes a really challenging border was needed. But it was really fun to have that mental challenge and stimulation, and I know now that everyone was really working hard to make great borders for everyone else.

The truth is, my quilt came back COMPLETELY changed.  It really had grown up -- but I LOOOOVE the direction it took. When I got it back, the last girl had put a gorgeous ending border on it, but when I put it on my bed I realized that it would be too small to cover my sheets (especially with a 1-3% shrinkage factor). While I love my children dearly, this was MY quilt, and I really wanted it to go onto my bed.

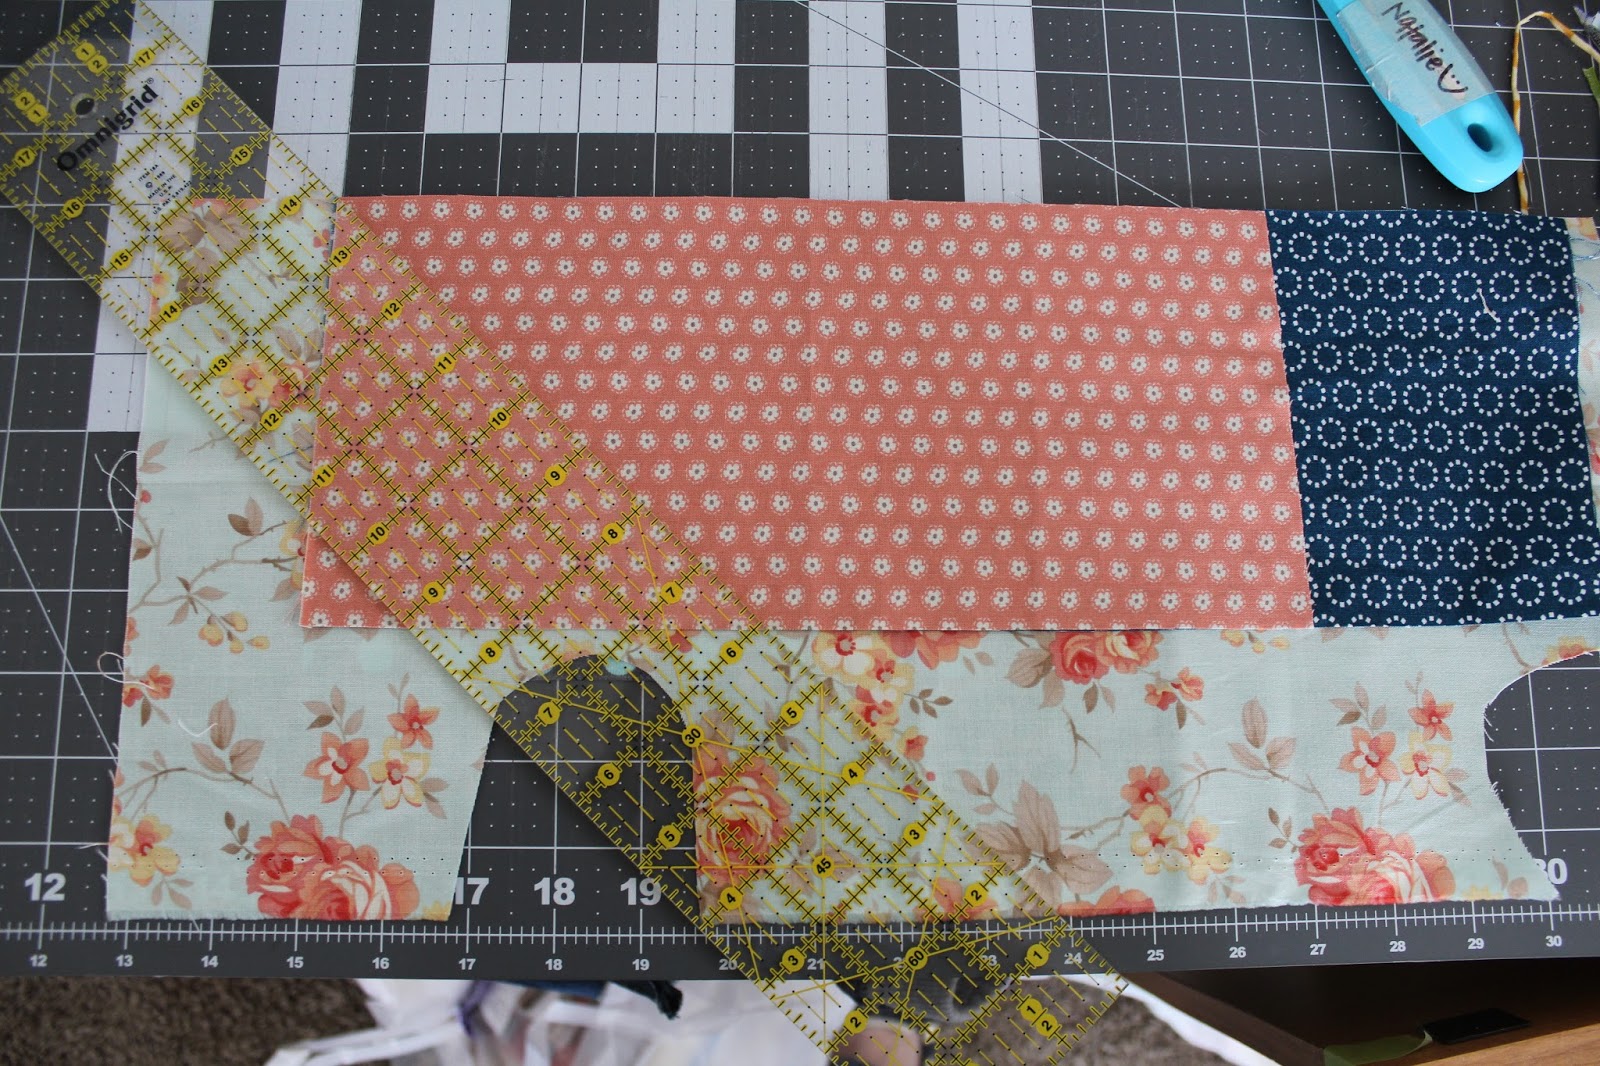
So I decided to make one more 6" border, all the way around. And then I was stuck. There were so many amazing ideas in my quilt -- did I highlight the arrows? The braids? Did I repeat some of the center pattern? It seemed the choices were endless -- and I really, REALLY didn't want to mess up this beautiful quilt!

So I left it for about 6 months.  In that time, I pulled it out at least 10 times, and put it on my bed a couple more times, and didn't get any inspiration at all.  Then Christmas came and wiped me out, so all January I sketched out ideas and planned and finally came up with a plan.  I decided to use all the same fabrics as the center to make four separate borders, with 6" farmer's-wife-inspired corners.  The top border would be like Allison Harris's Scout pattern (which I already own), the bottom border would be a snail-trail design, the left side would be military stripes, and the right side would be a nod to the tribal/Navajo blanket design trend that's so popular right now.

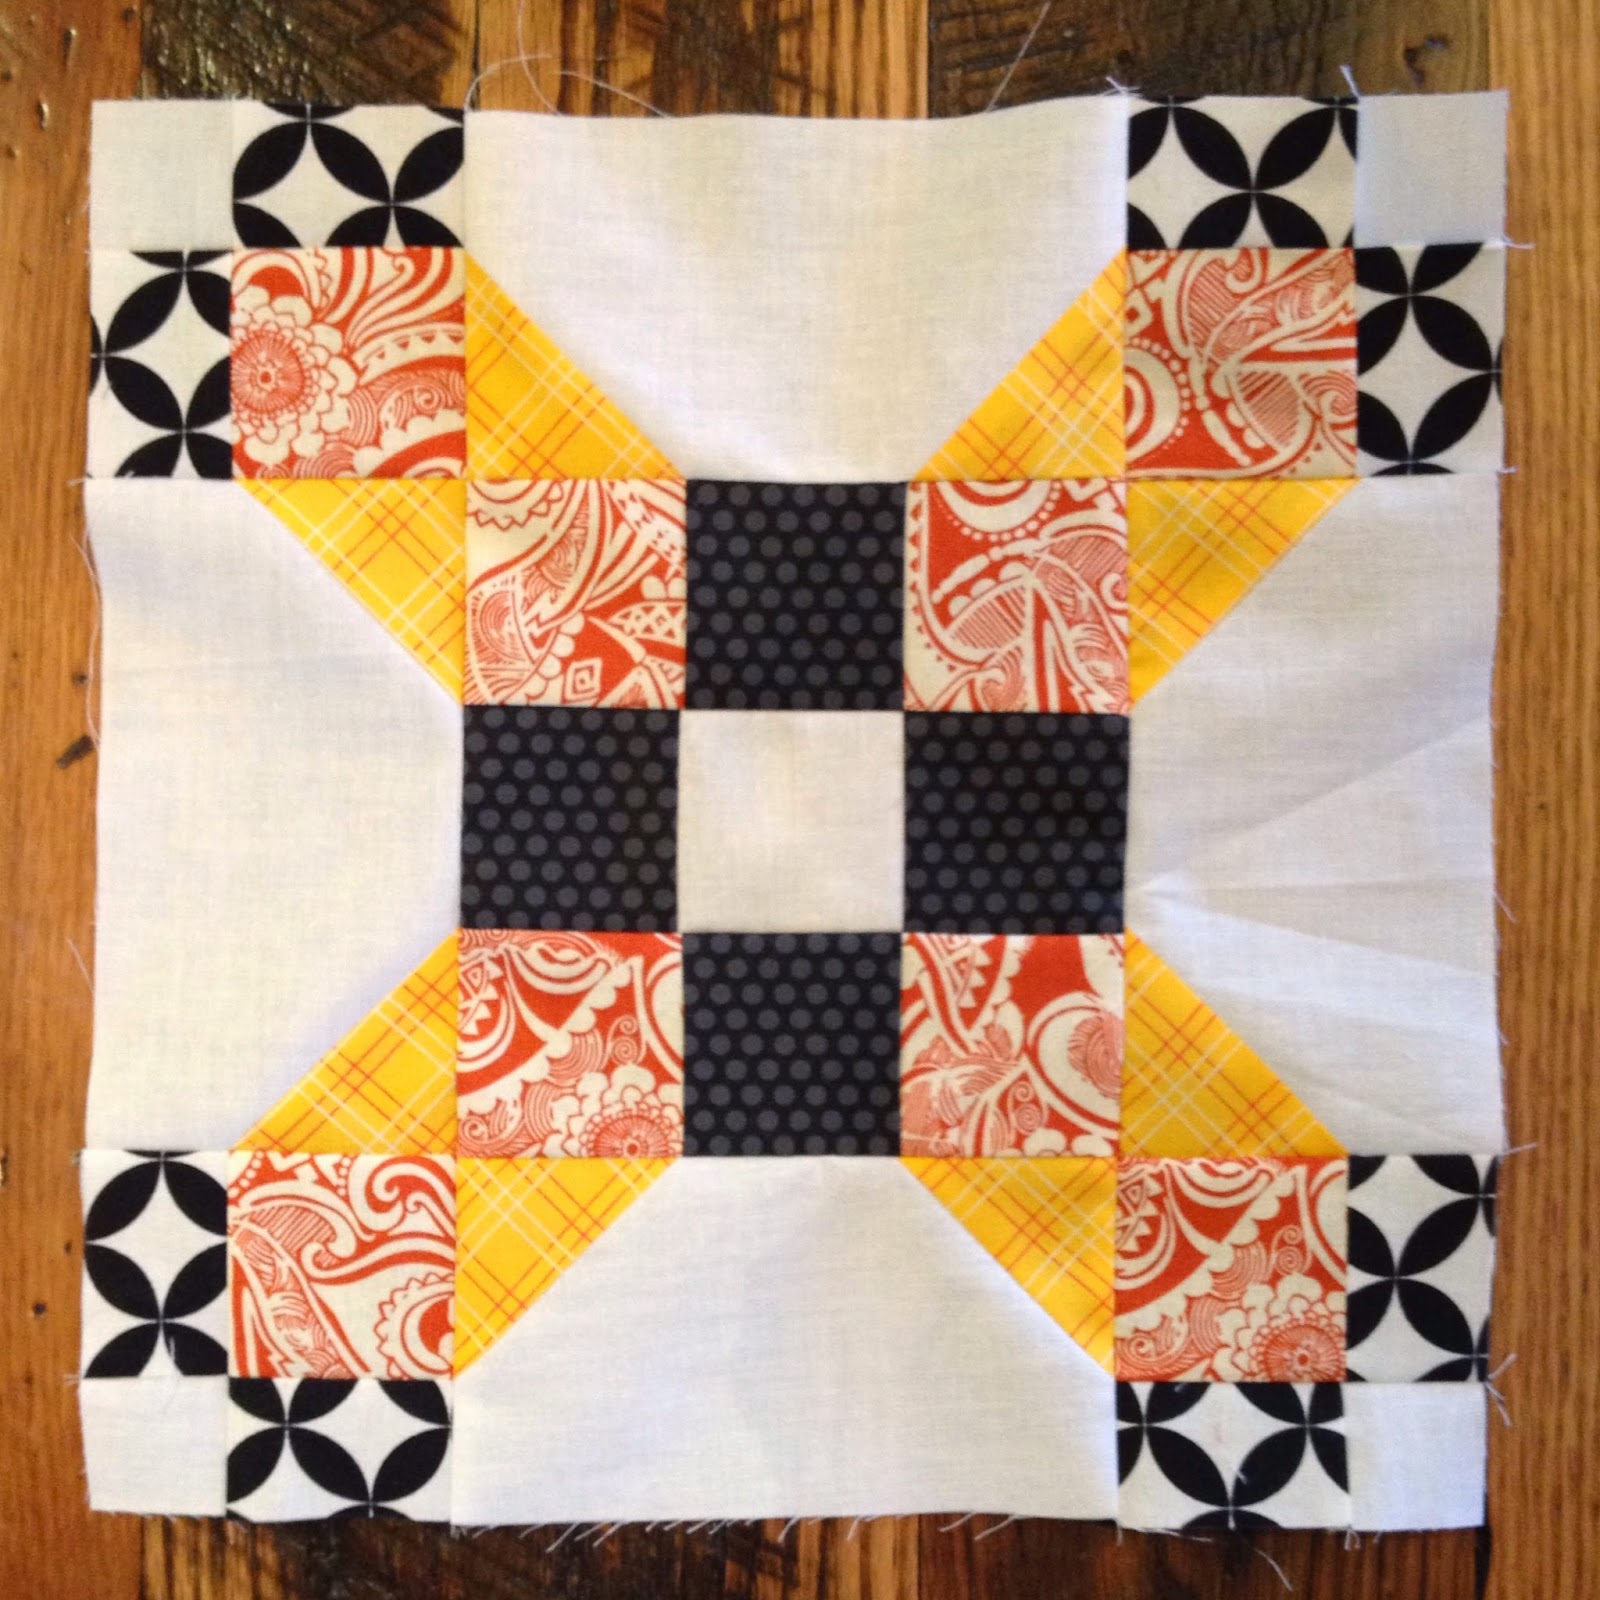
As you can see below, that plan changed and evolved -- now it has simple, chubby plus signs on top (a friend told me it might be Puss in the Corner?), a cute block I found on Pinterest (bento box maybe?) for the bottom, and plain corners. The left and right sides stayed virtually the same as the plan.


* I couldn't decide which picture to post here -- so I posted both! You can see each side better in one picture, but not the other. Please don't mind my Halloween décor... or Parker (he really wanted to be in the picture -- that should have been my first clue!)... :)

I paper-pieced the military stripes (do you see it that way? I really think they look like that!) so they would have accurate center matches, and I think it worked out really nicely. If I had it to do over, I would have changed a couple of things about the placement on the left and right borders, but now that it's done I won't change a thing!  The chubby plus signs and bottom border turned out EVEN CUTER than I had imagined, and I think the white background makes the whole quilt just a little lighter than it would have been without that extra border.  I'm so, so pleased with the end result -- and I'll tell you right now, I would do another Round Robin in a heartbeat!

I did learn a couple of things the hard way. First, to respect others' work.  I had an idea for one quilt to change a border, because I felt like it just didn't go with the rest of the quilt. In the end, I just added to that border, adding some applique on top of it. I feel like that was a much better choice -- and that it would have been so disrespectful to change the hard work someone else had done.  Second, I am REALLY good at waiting for things -- sometimes the anticipation of a really fun present is better for me than the actual present. Now, don't get me wrong -- I ABSOLUTELY LOVE my quilt, but I was afraid right at the end that I wouldn't, and then I wouldn't even have anything else to look forward to!  Third, I had to learn to trust other quilters with my own ideas. It was really hard for me, because I guess I'm a bit of a control freak, but I think it was so good that I reached out and did something outside my comfort zone -- I really grew from this experience, and I think it's made me even more prepared to write my patterns!

Monday, March 9, 2015

Cabin Fever II & BFTP links

Well. I didn't remember to post last week, and I didn't get any blocks done for this week because I was busy getting ready for Cabin Fever II.  I got to go on my birthday (and got one heck of a present from the ladies -- ever heard of Pinup Guys fabric??) through last Saturday, and it was so much fun!!

First of all, the links for last week's post is by our friend Ginny at Marion's blog, {here}. And for this week, it's Maggie at Shortcookie, and the links are {here}, {here}, and {here}. (if you can't access all the links, that means they're not all up yet -- at the time of this post there's only one.  I'll delete this disclaimer when I've linked over to all of them.)

Okay, now on to Cabin Fever II.  I was lucky enough to go to Cabin Fever in February of 2013, and that's where I decided I wanted to publish patterns. That meant I got an early pass to Cabin Fever II -- and it was a good thing, too, because the tickets were sold out before sales ever hit the public!  We got to go up to a BEAUTIFUL cabin up Hobble Creek Canyon, just about 15 minutes away from my house.  And all I did for three days was sew and sew and sew -- it was just like heaven!

I took waaay too much to work on, but I also managed to get quite a few projects completed.  I did four baby quilt tops...


 and two bee blocks (I'm part of the Beehive swarm #21)...


and five improv trees for my QBX group...

and one little secret project (this is one block of 36 that are complete). 


For Christmas last year, Joel gave me a jelly roll of Lexington, by Minick and Simpson.  At first glance, I thought it was pretty yuck -- it's not my style AT ALL, the colors are very muted, which I don't love. (Don't tell Joel -- he was really proud of his choice!)  So, I decided that if Joel loved this jelly roll, I'd make him a quilt for his birthday.  He's always a little sad that a lot of the quilts I make go to other people, haha.  And as I worked with this jelly roll, I really fell in love with it -- it has so many really beautiful prints in it!  And the colors really grew on me too.  I think it will really be a pretty and unusual addition -- and it will be the PERFECT secret birthday present for Joel!